Count down to Sale-a-bration and the new Occasions catalog

Thursday, December 27, 2018
Merry Christmas y'all!

It's so hard to believe that 2018 is coming to an end. Part of me wants time to stand still and another part is totally ok with the end of the year. We've got so much going on over here in our little corner of the world that the break that this week brings is SO worth it.

This week and a little of next week as well, I am sharing sneak peaks from the new Occasions and Sale-a-bration catalogs over in the A Little Kinder Stamps Facebook group. I started my sneak peak with one of my favorite sets, Happy Tails stamp set and punch. Let's take a look at the 2 projects that I shared over in the group and break them down.


This card was inspired by one of the cards in the Occasions catalog. I love the balmy blue color with crumb cake. I started with a Whisper White Thick cardstock. The thick is WAY better for card bases. It's stronger and in my opinion makes a better card foundation, and just like in construction, a strong foundation is a must!


I cut a piece of Whisper White cardstock 1/4" smaller than my card base and ran it through the subtle embossing folder to add a texture to my card. Then I added a 1/2" strip of Balmy Blue DSP. I then cut a square of Balmy Blue with the stitched square framelits. I then stamped the paw print in Balmy Blue. The finishing touch is the little heart on the puppies collar. I love this set.


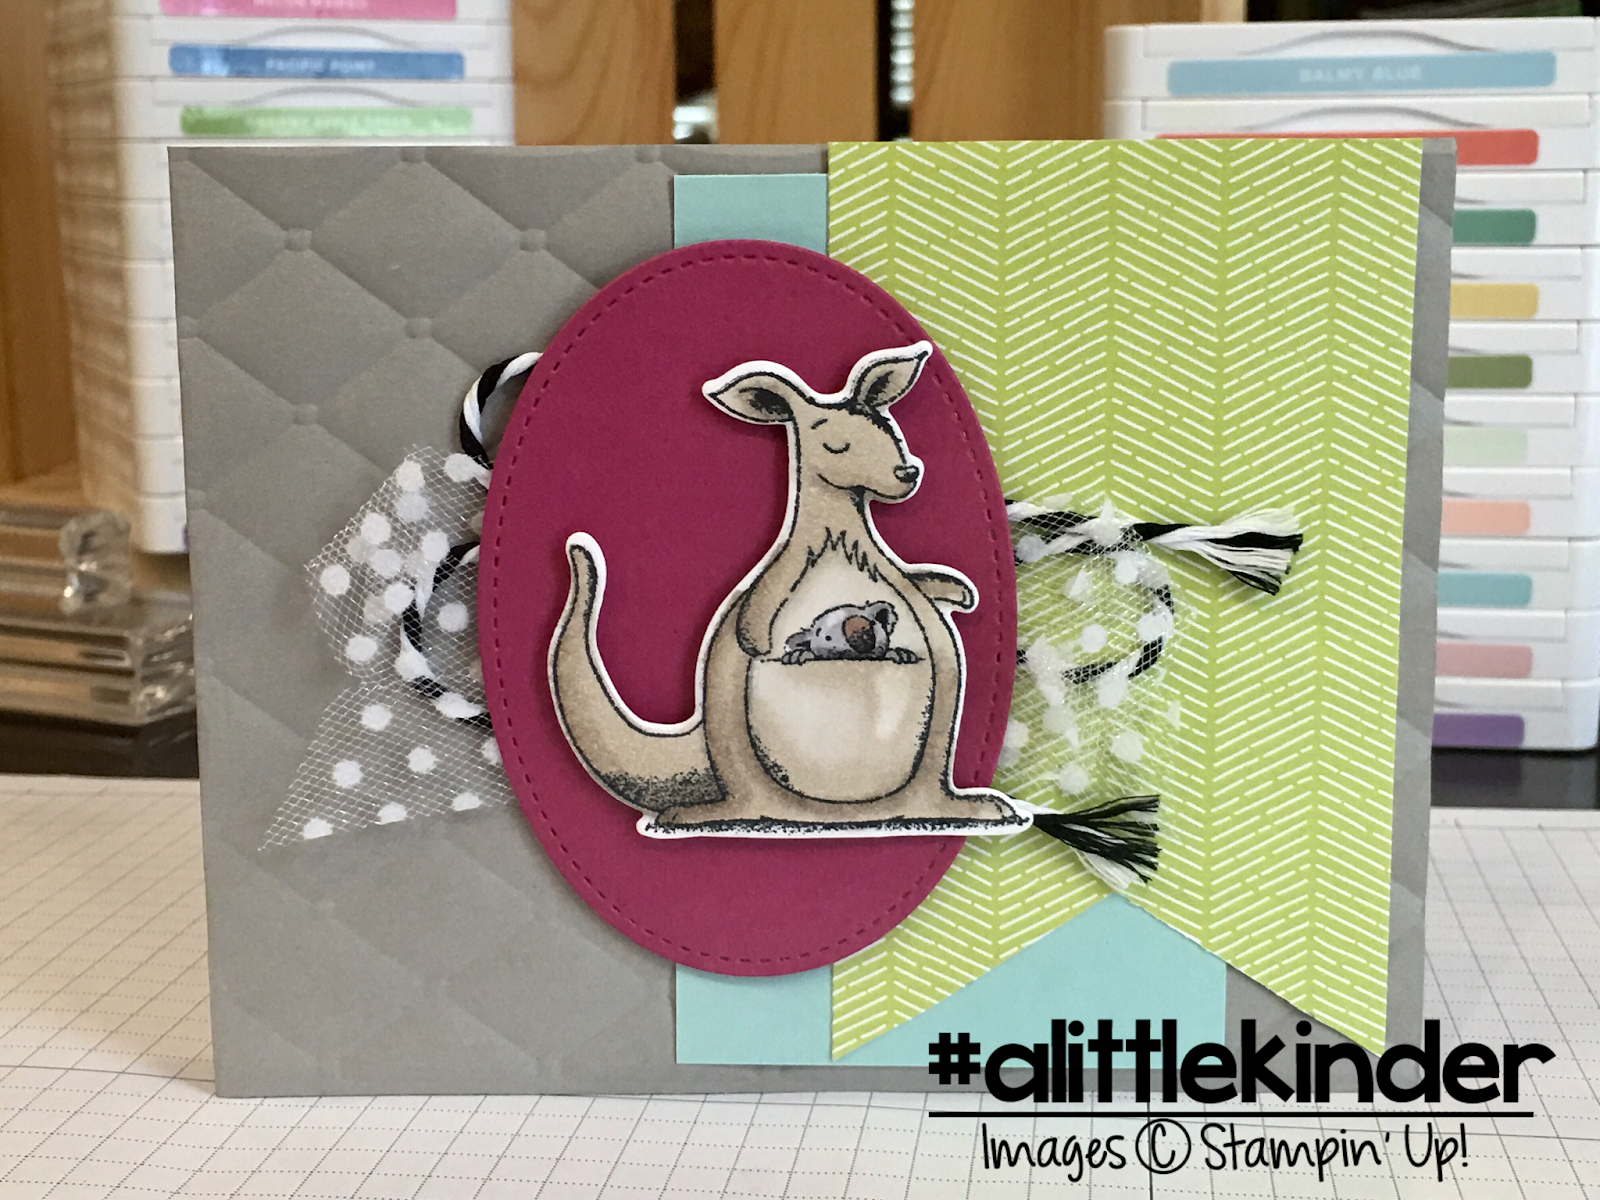
Have you noticed the trend of text down a card front in different intensity of ink? I used that to create this #simplestamping card. Stampin' Up! has set a goal for demonstrators to create more cards that fit the category of simple. This means that we get to inspire the crafting world to create cards and projects that do no include everything and the kitchen sink. I love this card. The simplicity makes each element shine. I started with a card base of Thick Whisper White cardstock. The puppy is gray granite  but the ink color in the background is Basic Gray.


Don't you just love this little dog?? I mean it is so adorable! He reminds me of our Rylee.  I cut out a circle of vellum using the layering circles. The ribbon on this puppy is a Sale-a-bration item and y'all you can get it for free! It's part of a set of ribbon that is free with a $50 purchase. It is YUMMY and ties so beautifully. I used dimentionals to raise up the vellum circle to give it a little more emphasis.


I would LOVE to be your Stampin'Up! Demonstrator!


If you are in the United States and not currently working with a Stampin' Up! Demonstrator, I would love to earn your business. You can order supplies in my online store, here.


0

Get Ink'd Christmas Edition #2

Wednesday, December 12, 2018
Hey y'all!
I'm back today with some cards using the Farmhouse Christmas Bundle. Both of these cards feature the Buffalo Check Background stamp.

Up first is a card that would be super easy to make many many many of using the Stamparatus. Using the 2 plates in the Stamparatus, you would set up the Buffalo Check stamp on one side and the Merry Christmas greeting on the other. Stamp 4 1/8" x 5 1/4" panels of Very Vanilla paper with Grey Granite ink. Before changing plates stamp Cherry Cobbler panels with Tuxeto Black Memento ink. Then switch over to the Merry Christmas sentiment. The whole card is on a Mossy Meadow card base.

The second card uses the exact same stamps but adds in some of the glimmer and wood grain papers. This card is built on a Crumb Cake card base that was stamped in Memento Tuxedo Black in. The sentiment was stamped on the Mossy Meadow circle and on whisper white in Mossy Meadow.


Products Used:

I would LOVE to be your Stampin'Up! Demonstrator!


If you are in the United States and not currently working with a Stampin' Up! Demonstrator, you can order supplies in my online store, here.


0

Get Ink'd Christmas Edition...#1

Monday, December 10, 2018

Hey y'all!
I can't believe that it is December 5th already! My passion may be stamping and paper crafting but I still hold a day job as a pre school teacher. I love my littles, especially this time of year. They are wide eyed and full of wonder. They inspire me so much.

The next few Get Ink'd posts are going to showcase the Farmhouse Christmas set bundle (149941). This set literally spoke to me when I opened up the Holiday Catalog for the first time! The little truck with tree reminded me so much of our Snow Village that we put up each Christmas season. And it seemed to scream "Arkansas". I knew our family Christmas Card would come from this set.

Today's Samples are treat boxes made with the Takeout Treats Framelits. I love having little treats on hand to hand out... see the mailman, give a treat kind of thing. Here are the results:

Box 1:

This box is made from the Farmhouse Christmas DSP. I love how easy it was to create using the Take out Treat framlit.

Box 2:


I started with Crumb Cake cardstock. After die cutting the box, I stamped the Buffalo Check background stamp in Crumb Cake. I LOVE the look of this!. I added some tags and a glitter star, filled it with candy, and it's ready to give!

Box 3:

It's ok to have favorites, right? This box is definitely my favorite of the three. I LOVE LOVE LOVE the Buffalo Check stamped on the Take Out Treat box. I watercolored the truck for a softer look. Yep this is definitely my favorite!


Products Used:


I would LOVE to be your Stampin'Up! Demonstrator!

If you are in the United States and not currently working with a Stampin' Up! Demonstrator, you can order supplies in my online store, here.


0

TBT- Use your stash! The challenge is issued

Thursday, July 26, 2018
Hey y'all!
When I started paper crafting years ago, I found that I fell in LOVE with all kinds of patterned paper. I would buy the paper and lovingly place it into my stash. But there it would sit... kind of like a black hole swallowed it up. I mean what if I needed that paper for a card or scrapbook page but I had already used it???

The struggle is real. But here is the thing, that paper would sit there indefinitely. I still have stacks of baby boy papers that I "fell in love with" and Jackson is now 16! If the perfect use for that paper hasn't happened by now, I'm not sure it will. So today I am throwing down the gauntly and challenging you to USE YOUR STASH!

Here is a card I made using the Tuttie Frutie DSP from Sell-a-bration this year. I fell in love with it, had to have it. When it got here, I opened the pack and let it sit. I just couldn't bring myself to cut into it. Please tell me I am not the only one...

So here are two cards to inspire you to use your stash!


This card used the Tutti Fruitti paper and Party Pandas (I can't get enough of this stamp set!!!). I cut strips of the DSP and layered them behind a circle cut from the Stitched Shapes framelits. The sentiment came from old Paper Pumpkin kits. And the finishing touch is the Whisper White polka dot tulle ribbon.


This second card also uses strips of paper but these are wider. I used sequins and wink of stella to add some bling. The panda is the one that is holding the envelope and that got me thinking about what else he could be holding. I happened to have the Varied Vases set on my crafty corner table and quickly stamped and fussy cut one. Isn't this adorable?!?!


Here is a close up of the panda holding the vase. I think it's pretty cute. 


Right now is a great time to be working with your stash because of the buy 3 get 1 free DSP sale! The images below will take you to my online store.


Buy 3 get 1 Free Designer Series Paper sale:


Products:


I would LOVE to be your Stampin'Up! Demonstrator!


If you are in the United States and not currently working with a Stampin' Up! Demonstrator, you can order supplies in my online store, here.


0

Get Ink'd # 18 Hello Rhino card

Tuesday, July 24, 2018
Hey y'all!
I am so excited to share this card with you. I am LOVING the Tropical Escape DSP. The color combination of pinks and greens and black is amazing! And the prints are so trendy. I think that might be my favorite thing about Stampin' Up!, they stay on trend. Alright, let's talk about this adorable card!

This card was made with left over pieces from other projects. The DSP is double sided and BEAUTIFUL! I love Berry Burst with the greens in this paper. And this adorable rhino with the little bird sitting on the tusk. I used the greeting "Hello" from Varied Vases set. I love the drawn black lines around the edge of the card. The finishing touches for this card are the Lemon Lime Twist ribbon and the mini sequin trim.


The rhino was colored using the Stampin' Blends. I stamped the image with Memento ink. Then used the Smokey Slate light and dark blends to color. I used the Light Crumb Cake for the tusk and Night of Navy for the bird. The rhino is popped up on dimentionals. I'm still learning to color with the blends to get the finished look that I want but y'all!!! They color like a hot knife through butter!

I hope that you have been inspired to create something today! As always, the clickable product images will take you to my Stampin' Up! store where you can purchase any of the supplies I used in this card.

Products:


I would LOVE to be your Stampin'Up! Demonstrator!


If you are in the United States and not currently working with a Stampin' Up! Demonstrator, you can order supplies in my online store, here.


0

Get Ink'd #17 Tropical Chic Thank you card

Thursday, July 19, 2018
Hey y'all!

The card I am sharing today is one that won my stamp team creative challenge. There is so much yumminess in this card! All the layers, the amazing DSP (patterned paper), embossing folders, and wink of stella.


I love this color combination inspired by the Tropical Escape DSP.  To get a two tone stamped image, I stamped the image in the lighter ink and then "rolled" the edges in the darker color. You can create a similar effect using the sponge daubers or stamping sponges.


The base for this card is a top fold 4.25"x 5.5" Thick Very Vanilla card. I layered a piece of 4"x 5.25" DSP over the base. I added the Power Pink strip and the Very Vanilla (stamped with Basic Black) strip over the DSP. I originally cut a square of Berry Burst but decided to cut it into 2 pieces. I liked the hint of green that peaks through. The circle was cut from Very Vanilla paper and  embossed with the Polka Dot Basics embossing folder. I wanted the dots to stand out so I sponged Power Pink ink onto the flat side of the embossing folder. Here is a close up:


I really love this technique. I plan to share a more in-depth how to at a later point. To finish off this card, I stacked the leaves under the Powder Pink circle and the flowers on top. I did color the flower with Wink of Stella. I wish I could figure out a way to make that Wink of Stella show up better in pictures. I'd love to know if you have a tip.

Don't forget about the DSP paper sale that is going on, this paper is part of the sale. I stocked up on it!  You can too by clicking on the product pictures below. They link to my online Stampin' Up! store.

Products:


I would LOVE to be your Stampin'Up! Demonstrator!


If you are in the United States and not currently working with a Stampin' Up! Demonstrator, you can order supplies in my online store, here.


0

Get Ink'd #16- Animal Outing Kangaroo card

Wednesday, July 18, 2018

Hey y'all!
Being gone most of June, ok all of June, meant that lots of wonderful new catalog products sat at my house missing me. The Stampin' Blends were one of these products. This card was one of the first I used them on. I've never tried any type of Alcohol ink pen. When I would read or watch others using Copic markers and that they needed 3-5 markers to make one area look ok, I knew it was outside of my budget. Where I live Copics run about $7.95 a marker... I about p'eed myself when I realized the cost. So I walked away from alcohol markers. Not to mention that there are so many ways to color an image.

Then I got to play with the Stampin' Up! Blends alcohol markers. These come as a light and dark version of the pen... think light Old Olive and Dark Old Olive. They can be purchased as a set or individual per color (no overall get all the colors set is available). A set of light and dark is $9. This works so much better in my budget, and if I just wanted say Light Old Olive it's $4.50.


One thing I quickly noticed about the Stampin' Blends was how smoothly they applied ink to paper at BOTH tips. One of my personal pet peeves is a duel tip marker where the "bullet" tip doesn't work as well as the brush tip. That is NOT the case with these markers! I used the bullet tip for the koala and had no issue with it being dryer or not applying ink like the brush tips. It will be important to keep these markers flat (on their side) when storing them. If they are stacked on one end then one of the tips will dry out.


This card used the new Tufted Dynamic Textured Impressions Embossing folder. I LOVE the look! It adds so much to use an embossing folder on any project. The patterned paper is from the Animal Expedition Designer Series Paper. I love the look of this one with the white herringbone pattern. The blue is Pool Party and the oval is Berry Burst that I popped up on Stampin' Dimensionals. The finishing touch on this project was the Whisper White polka dot tulle ribbon layered with a black and white bakers twine. I decided not to put a sentiment on the outside of the card. I like to have a stash of cards that could work for any occasion and this is going to be one of those cards!

The products I used are below with clickable links to my Stampin' Up! store. July's hostess code is K4EERHMN and any order over $50 will get a free gift of the Red rhinestones in my thank you package.  I hope that something inspired you to create today!

Products:


Don't forget about the buy 3 get 1 free paper sale! 


I would LOVE to be your Stampin'Up! Demonstrator!


If you are in the United States and not currently working with a Stampin' Up! Demonstrator, you can order supplies in my online store, here.


0

Get Ink'd #15 Broadway Bound Wish cards

Tuesday, July 17, 2018
Hey y'all! Today I'm sharing two cards I made using the Broadway Bound suite.  I fell in love with this set when I first saw the new annual catalog. There was something about the gold with the limon lime twist and lovely lipstick set off on black that drew me in.  For these cards I did not include the lemon lime twist but added gray granite. I wanted the lovely lipstick to take center stage...


This card is a 4 1/4 x 5 1/2" side fold card made from Basic Black. I layered some of the Broadway Bound DSP on top of Lovely Lipstick cardstock. Then I die cut about 8 of the marquee from the Broadway Lights Framlits Dies and layered them on top of each other. This gave more dimension to the marquee and I really love the finished look below. "Wish" is raised using Stampin' Dimensionals. A little of the left over black and gold twine from June's Paper Pumpkin box mixed with the Polka Dot Tulle Ribbon finished this card perfectly!


You can really see the dimension in the marquee in this picture (below). This is a super easy technique but it makes a big impact on the card! I'll share more about how to make 3D die cuts in another post. 


This is the second card I am sharing today. I've still not figured out if I want to post several cards in one post or just a single card or really how to share with you all. I'd love to hear your thoughts in the comment section or on the Facebook page.

I actually like this card the most! It's a great man's card! Not that women won't love it too. The Lovely Lipstick color is a pinker red but not so pink that it's supper feminine and not so red that it garish! I love the Basic Black dots over the Gray Granite word wish. And I did add a little wink of stella to the die cut word but you really don't need it. 


This is a close up of the dots over the word. See that "washed" out spot that is a poor quality stamped image? I kind of love that! It reminds me of old marquee letters that are rusted out. When you make a "mistake" keep going, you might actually like the end result. That's my tip for the day. LOL... don't toss out all your mistakes. Sometimes they make beautiful cards, just not the card you had envisioned at first. 


The links below are to the products I used in my Stampin' Up! Store. I hope that you found something that inspired you to create today!

Products:


And don't forget about the buy 3 get 1 free paper sale!


I would LOVE to be your Stampin'Up! Demonstrator!


If you are in the United States and not currently working with a Stampin' Up! Demonstrator, you can order supplies in my online store, here.


0

Paper Sale! Stampin Up! DSP buy 3 get 1 free

Friday, July 13, 2018
Hey Y'all!!
Have you heard? In July Stampin Up! had a special paper sale going on. Buy 3 of the selected paper packs and get 1 free. Wanna know what papers are included??

I LOVE patterned paper! And the Designer Series Paper makes creating so easy because I can match solid cardstock and stamp ink to the paper so easily!!! Take a look at what is being offered in this special...


Alright! What packs do you need in your crafty space? Clicking on the pictures below will take you to my Stampin' Up! store where you can order them and get a hand crafted thank you card mailed to your home from me!

Buy 3 get 1 free paper sale:


I would LOVE to be your Stampin'Up! Demonstrator!


If you are in the United States and not currently working with a Stampin' Up! Demonstrator, you can order supplies in my online store, here.


0

Get Ink'd #14 There's so much to love about you card

Thursday, July 12, 2018
Hey y'all!

Today's card was a happy accident! I was playing with color combinations... like which yellows look good together. I wanted to see how So Saffron and Mango Melody looked so I grabbed a stamp set that has 2 step stamping and started to play. Here is the end result.


The card base is Gray Granite (4 1/4x 5 1/2") with a side fold. Then layered with Whisper White, Artistic Impressions DSP, Blueberry Bushel, and the stamped piece of Whisper White. I used Night of Navy gingham ribbon and a second generation Night of Navy stamped sentiment. Y'all I ran out of Night of Navy paper and I felt that the Blueberry Bushel was close enough to the light places in the ribbon to use together. I did use my Stamparatus to line up the flowers and the "grass". I'm still getting used to pulling it out rather than a block and eyeballing it. I'm happy with the results!


To order the supplies I used click on the pictures below and you will be taken to my Stampin' Up! store. I hope that you were inspired to create something today!

Products: 


Don't forget about the paper sale happening until the end of July! It's a great time to stock up on the paper I use in this card and some of the other great papers!

I would LOVE to be your Stampin'Up! Demonstrator!


If you are in the United States and not currently working with a Stampin' Up! Demonstrator, you can order supplies in my online store, here.


0

Get Ink'd #13 Color me challenged card

Tuesday, July 10, 2018
Hey Y'all!!
Today I'm sharing a color challenge card I made for my team's monthly color challenge. Here is the inspiration that we were given:


And this is what I made:


To get the two different shades of Real Red and Mint Macaron, I used the second generation stamping technique. This is where you ink the stamp and stamp it off on scrap paper. I love the way that this gives two perfect shades of the same color. I used Blueberry Bushel paper because I'm out of Night of navy. Really? Who runs out of paper? Me apparently. Anyway, I pulled out my Brusho powders to make the background. Brusho's are highly concentrated watercolor pigments that you sprinkle on to paper. I used watercolor paper for this card but you can use Thick Whisper White or Thick Very Vanilla.


I hope that you were inspired by either the color combination or my card. Get your supplies by clicking on the pictures below and get crafting!

Products:


I would LOVE to be your Stampin'Up! Demonstrator!


If you are in the United States and not currently working with a Stampin' Up! Demonstrator, you can order supplies in my online store, here.


0

June 2018 Paper Pumpkin thoughts

Monday, July 9, 2018
Hey y'all!

I'm back from our go west trip and I could not wait to get to the creative corner (aka my dinning room table). After laundry, and a trip to the grocery, and going through a HUGE stack of mail, I opened up my Paper Pumpkin box.


When I signed up with Stampin Up! I was sent a Paper Pumpkin kit with my starter kit. To be honest, I did not like it at all. It wasn't me so I set it aside, and told myself that it was better to pick my supplies and not to get a box. Then we were told that June's box would coordinate with a suite from the new catalog. That right there was enough to get me to try a subscription.

I blogged about Paper Pumpkin here... but let's re-cap real quick. Paper Pumpkin kits come once a month with either cards or projects. There are at least 6 card kits per year and each kit has a Stampin' Spot color that doesn't repeat during the year. To start with the current month's kit, you do have to order by the 10th of that month. So if you want July's kit you need to order here by July 10th.

Let's dive into this month's kit. It coordinates with the Broadway Bound suite, which I am over the moon excited about!


There are 8 card bases and the supplies for those cards. The direction sheet is easy to read and makes completing the cards a snap. This was the first project I tackled post trip for one reason; I din't have to think about it. In under an hour I had 8 cards that were layered and embellished. The best part of the afternoon was how much fun I had just following directions and making cards.

Let's look a little closer at the stamps. One stamp that I felt was missing from the Broadway Birthday set was a cake of some sort. This Paper Pumpkin kit makes up for that "missing stamp". I like the little sparkle stamp and think it would be super cute with a jewel or sequin in the middle of some. And the sentiments are perfect to mix with the Broadway Birthday set. Later this month, I will share some projects using them.


I know many people don't complete the cards as they come in the box. That is they make alternatives using the supplies. While I can see me doing this, it wasn't my goal with this month's kit. Now let's look at the cards I made.


This card is exactly by the directions and I love it!! I love the basic black, lovely lipstick, and lemon lime twist color combination. I love this card base. Y'all I would about die to have more black and white card bases or DSP.

 This is the card that I made using the second design. I did change one thing on this card. See those dots? They are made with the Broadway Birthday stamp set balloon stamp. I was dying to use that stamp to make polka dots. I used Grey Granite for the polka dots. Here is a close up:

Bottom line: I'm intrigued. I really enjoyed this set. I loved working with the directions and that the pieces were easy to apply to the cards. In the US, this monthly box is $19.95. I have to say that the price is perfect!  When I was looking at the "fine print" of joining Paper Pumpkin, I found out that you can skip a month or quit at any time, no commitment. I thought that was perfect for me to try and not be roped into several months of something that I wasn't sure that I would like. Am I in love? Not yet... I'm in "like" and looking forward to July's kit.

Products:


I would LOVE to be your Stampin'Up! Demonstrator!


If you are in the United States and not currently working with a Stampin' Up! Demonstrator, you can order supplies in my online store, here.


0
Powered by Blogger.
BloglovinEmailPinterestTPT