Get Ink'd #3 Share what you love (Just Getting Started Ideas)

Monday, April 30, 2018
Hey y'all!
On Saturday I got a BIG OL' BOX of stamping goodies!!! As a demonstrator, I am able to pre-order one "suite" and it arrived. Ok so a suite is really just a kit of goodies based on a stamp set that Stampin' Up! releases early to demonstrators. This year it's the Share what you love stamp set.

Let me be COMPLETELY honest here, I didn't love this set when I first saw it. I was kind of sad this was the set that was picked. There are SO many awesome sets in the new catalog that I thought would have made a wonderful "suite". Then I started thinking about how the "suite" packages were presented to demonstrator and y'all!!! I totallly changed my mind. Each of the suites are designed with different stampers/ crafters/ folks in mind. The first level is called "Just Getting Started". This will be the suite we focus on. I have listed the individual products below because the suite isn't available until May 1, and if you happen upon this post after May 31 then the suite will no longer be available.

Today I am sharing some cards using just the materials in the Just getting started set. The first card I am going to share is my version of the amazing Susan Wong's card. This card was probably the card that made me excited about this early release suite. This card was made using Grapefruit Grove and Old Olive ink. I also used Momento or Basic Black in for the message.


This next card I LOVE and y'all it's just one card and INK! Yep... this one I wanted to keep super simple. I love to design cards with lots of detail but sometimes ya' just need a go to super quick great looking card. 

To make this card you will need Rich Razzleberry and Crumb Cake ink and Very Vanilla cardstock or cards and envelopes. The large background image from the Love what you do set was inked in Crumb Cake and stamped off once to create a lighter version of Crumb Cake (this is called Second generation stamping). The large flower is also created using a second generation stamping technique. I started with the image in the middle stamped in Rich Razzleberry, without re- inking the stamp I stamped it again at the top of my image. Then I re-inked and stamped off on scratch paper, and stamped the lower image. Last I added my message in Rich Razzleberry. 

Y'all I have a serous love affair with polka dots (don't tell my husband ok?) This next card is my version of a polka dot card made with Grapefruit Grove and Basic Black ink.


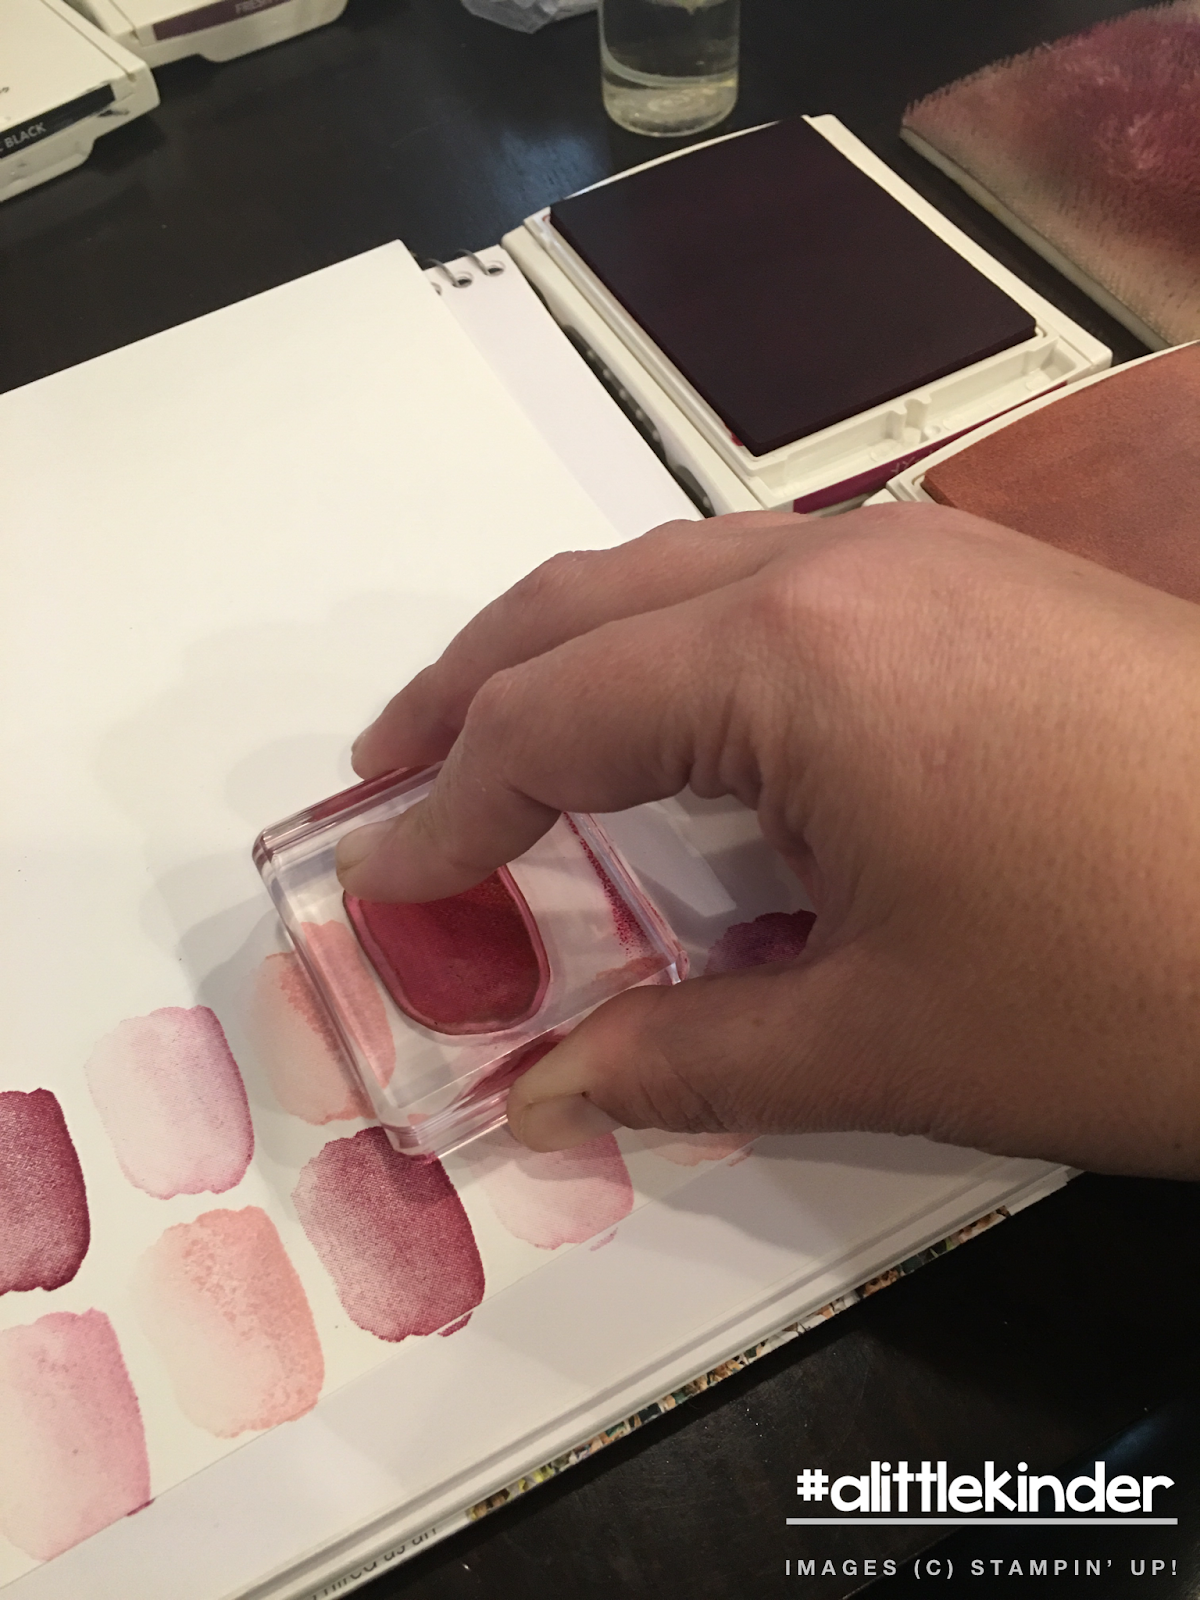
 So there are two little "blobs" in this set that could be used to make polka dots with. I went with the smaller of the two. Using first and second generation stamped images (that's big fancy for inked then stamped and stamped a second time without re- inking) I made the background. I used a piece of Very Vanilla cardstock that I cut smaller than my card to stamp on. Then I popped this up using Stampin' Dimensionals.

So tell me, do you love this set yet? Be honest, remember I was. It's ok to not be there yet. Since there are 3, yep 3 different Share what you Love suites, I am going to share with you 2 more days of Get Ink'd using just those products. I can't wait for you to see what I came up with!!


I would LOVE to be your Stampin'Up! Demonstrator!


If you are in the United States and not currently working with a Stampin' Up! Demonstrator, you can order supplies in my online store, here.


0

Limited-Time Bundles: Share What You Love Suite

Monday, April 23, 2018
I am so excited to share this video with you. The next several Get ink'd posts are going to match the "suite" or bundles that will be available starting May 1.  Watch this and tell me which bundle are you most excited about!


I would LOVE to be your Stampin'Up! Demonstrator!


If you are in the United States and not currently working with a Stampin' Up! Demonstrator, you can order supplies in my online store, here.


0

Get Ink'd #2: Best wishes Brown and Pink Birthday card

Saturday, April 21, 2018
Hey y'all!
I shared this card on IG and promised the written instructions here. This was a quick card that I made to give to an adult family member.  Here is what I used:


Petal Palette stamp set (clear mount)
You're Delightful stamp set (clear mount)
Archival Black ink
Powder Pink Classic Stampin' Pad
Early Espresso Classic Stampin' Pad
Whisper White, Early Espresso, Old Olive, and Powder Pink paper


To get started, cute a piece of Whisper White paper to 4" x 5 1/4". This is where we are going to create a custom background paper. I started with the "P.S. Happy Birthday" from the You're Delightful set and the dots from the Petal Palette set. Using Early Espresso Classic Stampin' Ink, stamp the words over and over in a line from left to right.


Once the background is completely filled, we are going to use the dots from Petal Palette and Powder Pink to add some depth to this background.  Using the same technique to stamp the words, you will stamp over the words with the dots until the card has dots from bottom to top.


I stamped the roses and small flowers from Petal Palette in archival Basic Black ink, and then colored them with the Stampin' Write Markers. (Tutorial coming soon).In the picture below you can see the custom designer paper that we made, as well as the fussy cut roses that I made. I also cut a strip of Powder Pink and Old Olive in 1/2" strips to layer on the front of


Let's make some magic by putting it all together. Layer your custom designer paper onto an Early Expresso card base that you cut 4 1/4" x 11". This will make a top or side fold card where the fold is on the narrow edge.  Using snail adhesive, layer the Powder Pink paper onto the Old Olive paper. These are going to be added to the bottom 1/4 of the card (see sample below). Add the fussy cut roses. The final step is to add the words "Best Wishes".


I would LOVE to be your Stampin Up! Demonstrator


If you are in the United States and don't already have a Stampin Up! demonstrator then you can order your supplies in my online store, here.


0

My favorite April oils (and why!)

Friday, April 20, 2018
April is all about spring weather here! Fresh blooms on trees... grass growing... snotty noses... itchy eyes. Yep all of it! But it's also when we start to see warmer temperatures and that desire to be outside grows. I can't stand working or staying inside when the temps are perfect and the sun is shining! But that yellow green blanket of stuff all over every surface is enough to stop me in my tracks! So this months FAVORITE oils are all about respiratory support.

1. RC- Supporting the lungs and sinuses naturally with essential oil encourages proper nasal function. R.C. is a unique combination that is soothing. It's made up of Cypress essential oil, Spruce essential oil, Eucalyptus globules essential oil, and Eucalyptus radiata essential oils

2. Raven (this little beauty is part of the premium starter kit!) is a terrific respiratory supporting essential oil blends containing: Ravensara Essential Oil (Ravensara aromatica) Helps restore proper respiratory function, nasal function and supports the sinuses. This oil is a cross between nutmeg and clove plants so it may support the adrenals. Eucalyptus radiata 
Popular oil used medicinally for ages to support the lungs and sinuses.


3. Lavender, pepermint and lemon- this trio of oils creates the well LOVED seasonal blend that helps so many people survive the green and yellow car season. Y'all know what I'm talking about!! Each of these oils are a power house in their own right but when they get together... BAM! I freakin' love this blend. And these oils come in Vitality oils and I can make a blend to take orally.

Do you see a theme here?? LOL! Spring in the south is NO JOKE! I use one or more of these oils daily starting in February and lasting into the early summer months.

Need oils? you can purchase them at www.joinkarend.com AND you can sign up to get a discount too!


0

Get Ink'd #1: You're Priceless

Thursday, April 19, 2018
Hey Y'all!
Sometimes I look at something in the craft isles or in a catalog or even online and it calls to me. The You're Priceless set in the Annual Stampin Up! catalog did that for me. Stunning set. I was like "I have got to have this set. But when it arrived I struggled. It was like my muse left the building.

In this post I want to share with you what I did to get my muse back and what the results were. Let's be honest when the muse leaves the building it can be hard to get started on any project. I find that just getting out black ink and making a mark helps! So what I did was start stamping to make color combinations on scrap paper.


Then I worked to make a BUNCH of just that image that I would be able to fussy cut and use for later cards. That typically gets my muse hopping. Here are all my little gems cut out.


Look at my handful of inspiration. As I was playing with the colors I noticed how nice the first and second generation of Berry Burst worked with Powder Pink. So I started working on the background that would end up being my card.

In the You're Priceless set there is a "color swish" kind of shape that is great for making color backgrounds. This is what I used and I love the results. I repeated the image in lines across my page. I would stamp the Berry Burst twice and then the Power Pink. Repeat.


Once I had my paper completely filled, I used Basic Black ink to stamp "Shine bright like a diamond" message stamp.  I lined up my stamp so that the bottom of the word diamond was centered in the color swatches.

With my very own personal designer paper ready, I cut a 4 1/4" x 5 1/2" rectangle to use as the base of the front of my card. I then cut a 1" strip of Berry Burst and a 1/2" strip of Powder Pink. I used the Stampin' Write Markers in Berry Burst and Powder Pink to "stitch" the edges of the matching strips.

I pushed out a 1 1/8" scallop circle in Basic Black paper. I layered 1" circle punched out of Whisper White. I also used the Basic Black Stampin' Write Marker to edge the Whisper White circle. I love Stampin' Dimensional! Y'all these foam pieces are used to make magic on cards! They lift the image up off the card, causing a shadow on the base card.

For this example,  stamped "thank you" from the Petal Palette on to part of the Power Pink strip that I had left over. I then cut a flag in the and attached it under the diamond gem shape. This is the final card:


I would LOVE to be your Stampin Up! Demonstrator


If you are in the United States and don't already have a Stampin Up! demonstrator then you can order your supplies in my online store, here.


0

Create Daily

Wednesday, April 18, 2018
Hey Y'all!!

A few years back I read and worked through the book The Artist's Way by Julia Camron. One of the things that stuck with me was the idea of "nurturing" the artist in you. And you do this by creating daily. These daily pieces or thoughts were not to carry pressure. They were not intended to be masterpieces, although there would be some that you really came to love. The basic idea was that you show up daily. The daily pages are intended to hold thoughts, prayers, dreams, they are a place to rest your spirit.

As I have come back to creating, I feel myself free again. I had plenty of hurts and baggage that hung around my neck but as I thought about the time I had spent with my Artist's Way journal, I realized that my baggage could fall away. And here I am creating and sharing again. My story is long and full of emotion. At the end of the day I was created to be someone who is creative. The "little artist" in me needs to be set free daily to play. For those of you in the classroom, think about that kid who struggles on days where there is in-door recess. Same idea, right? You have a little artist too. Your little artist needs permission to play.

Today on IG, I shared some revelations that I had this past weekend (I'm @alittlekinder). And I decided not to let fear win. I am jumping in with both feet and saying "I am a Stampin' Up! demonstrator!" I am so excited to share here and on IG and I am working on YouTube content (that is going to be a little bit of a learning curve for me).

Here is what I am promising you today. Create daily! While I won't always have a full blog post daily, my IG account will be FULL of daily creations and photos of what I am doing. I cannot begin to tell you just how excited I am about this and sharing my little artist with you.

WHEW! But I'm not done. You have a part to play in my #alittlekindercreatesdaily challenge. See it is WAY more fun when you do anything with friends. I want to see this hashtag BLOW UP! You define what creating daily looks like for you. Maybe it's scrapbooking. Maybe it's card making. Maybe it's making resources for your classroom. The list could go on and on. The important thing is that we do something each day. Feed your little artist. Nurture them and watch them grow!

I can't wait to see your creative side at #alittlekindercreatesdaily!

I would LOVE to be your Stampin Up! Demonstrator


If you are in the United States and don't already have a Stampin Up! demonstrator then you can order your supplies in my online store, here.


0

Color Revamp!

Tuesday, April 10, 2018
Y'all I about died when I got to peek inside the 2018 catalog... yes there are beautiful stamps and accessories that are going to keep me getting happy mail for months. But there is something that literally took my breath away.  It's the new colors! (and I'm not just talking the 2018-2020 In Colors either.)


Stampin Up! said this about the color revamp:
The spice of life is variety, and that’s especially true in the world of color. Stampin’ Up! makes a point to keep an eye on color trends across different markets and industries. When we see changes happening, we review our color spectrum to ensure that we remain consistently on top of the trends. This brings us to the 2018 Color Revamp!
In order to keep bringing you the most current and on trend colors, we decided it was time to give our color collections a makeover.
With this revamp, you’ll not only have new products to introduce and sell to your customers, but also have a new variety of shades that will inspire creativity and allow you to explore more sides of your crafting.

So just what does that mean for you?

Stampin Up! will still have the 4 color collections  and the In Colors (with 5 changing each calendar year). However there is an additional collection called Basic to include Whisper White, Very Vanilla, and Basic Black.  That freed up some space in the Neutrals collection to add a little color!

Additionally some colors are being moved around into new collections or are retiring, making room for new colors. So let's take a look at these jaw dropping changes.

--In Color Collection--

I can not wait to have this collection in my hands!! The colors are so crisp... Y'all I'm already dreaming of the cards made with the new In Colors.  I am so excited about using Stampin Up! Two step stamps now. Think about Pinapple Punch with Lemon Lime twist!!! Or how about Lovely Lipstick with Powdered pink? Literally makes me itch to be  creating!

Now let’s talk about the new color collections. Can a girl get real? When I heard that colors were retiring and some where moving collections I was not exactly happy. If you’ve been around very long then you know the pain of getting all the colors and all the Stampin Write Markers and then the reinkers only to be told that change is coming. Yep that was me. I was sad right up to the point that I actually SAW the changes. I might have shed a tear that chocolate chip would retire, but when I look at the new neutral collection I see why it was taken out.  Chocolate chip has a cool base color while the other browns are warmish  based. Then I realized that moving it out meant that Meek Merlot, Mossy Meadow, and Night of Navy could move in. Y’all it really makes a MUCH better color collection. Think of all the elegant color combinations that are now possible in just ONE color collection.

There are also some returning colors. Mossy Meadow is one of them. I remember this color and how much I used to love it. It paired with old olive... OMG!!! Just you wait until you get your hands on it. Promise!

As I look at these color collections, I feel like the colors match the collection name. The Regals are rich colors. They have depth and elegance to them. I was never a huge fan of old olive being in the brights. I think the Granny Apple Green is a better green to stand up to the brights.  And did you see the new brights purple???? Gorgeous Grape is EXACTLY right for this collection. I love Rich Razzleberry but y'all its wasn't purple to me. It is a perfect color for the Regals. I really can't wait to get my hands on all these colors and Stampin Up keep us in mind and have a little something up their selves for those of us who already own all the current colors. I can't wait to hear what this little treat is going to be!

-New Color Collections-


-The new colors-


So those are the new colors and the revamped color collections. You might be wondering what colors are leaving? Here is a list be sure to stock up before these retire on May 31.
  • Always Artichoke
  • Chocolate Chip
  • Elegant Eggplant
  • Island Indigo
  • Marina Mist
  • Perfect Plum
  • Pink Pirouette
  • Rose Red
  • Soft Sky
  • Tangerine Tango
  • Tempting Turquoise
  • Wild Wasabi
  • Wisteria Wonder

I would LOVE to be your Stampin Up! Demonstrator


If you are in the United States and don't already have a Stampin Up! demonstrator then you can order your supplies in my online store, here.


0

Getting my crafty on!

Thursday, April 5, 2018
So it seems like it was a lifetime ago that I was working full time in the craft industry. I had many items published in card magazines and scrapbook magazines. I taught classes across the country. And then something happened and I walked away from the industry that I loved. I won't reopen old hurts but know if I was willing to walk away from something I loved then coming back to it seemed like it would never happen.

But here I sit some 10 years later and that old hurt has healed and I am slowly starting to create again. And Y'all it feels amazing!! I can't begin to tell you how much I missed taking paper, and ink, and stamps, and ribbon, and pictures and making something beautiful. Not that everything that I have done in the last week could be considered beautiful, ha far from it, but the whole process and getting my "hands dirty" has been beautiful. I hope to start blogging again too. I've kind of missed documenting my life this way too. And who knows maybe I'll even get brave enough to do a video or two. The sky is my limit and I love that feeling. (It kind of reminds me of a Monday morning ;) )

Speaking of Monday morning, I LOVE teaching 3 year olds!! Y'all, this is what I have been fighting for, developmentally appropriate learning. It's such fun to get to build in blocks with a group of kiddos and talk about measurement words or positional words. Or sit at the art table and talk about how different shapes make up everything in the world around us. I have loved seeing each one of my students grow as a person and a learner. I hope to blog more about that too.

So here is the card I made. I used Stampin Up products. It was a super easy and quick card that I could do with just about any stamp set.

How to make the card:
1. I started with whisper white cardstock cut to 8.5" by 5.5". Then I folded it and scored the edge. The scoring makes a BEAUTIFUL edge that isn't bumpy.
2. I used the stamp set that come in the  "Oh Happy Day Card Kit" (side note the cards that you make from this kit are adorbs!!!). I picked the hi circle stamp but I have also done this card with the Hello, Cheers, and Thank you stamps from the set.
3. I wanted a "weathered" look to my stamped images so I used the Stampin' write markers brush tip in Mellon Mambo and Tempting Turquoise.
4. To get the color variation, color the stamp and "stamp off" one time. Then stamp on your card. The darker image will be on your scrap paper and you will get the lighter color on the card.

Here are the products I used:


0

Grillin' and Chillin': 3 grill ready recipes

Monday, April 2, 2018


Are you ready for warm weather? Man this winter is for the birds!! I am totally ready for summer. #allthesummerthings Today I wanted to share three grill recipes that we LOVE!

1. Italian Dressing Chicken!

Y'all this is GO TO in our house. We can eat it all summer long, and winter too. It just tastes better grilled. And this one is super easy!


  • Take whole chicken breasts and either cut into strips or cut in half.
  • In a glass bowl pour our enough Italian Dressing to cover chicken completely. Add 1-2 drops of Vitality Basil and Rosemary essential oils. I also like to add a drop or two of Vitality Black Pepper essential oil. 
  • Add chicken to dressing and essential oil mixture and coat completely. Set in refridgerator to marinate over night. Y'all don't rush this part!! Leave it over night, I promise you wont be sorry. 
  • Grill and enjoy!
Some of our favorite spin off's are using zesty Italian dressing or adding Vitality Lemon and Lime essential oils. 

2. Steak... yummy yummy sauce

This one has quickly become our favorite steak marinade. 
  • In a glass bowl mix the following: 
    • 1/4 cup of oil (grapeseed is great for high temperature cooking)
    • 2 drops Black Pepper Vitality
    • 1 toothpick swish of Thyme Vitality
    • 1 drop Lemon Vitality 
    • Pinch of red pepper flakes
    • 2 cloves of garlic, minced 
    • Salt to taste 
  • Mix together and marinate your steaks for 30 mins to 1 hour before grilling (we like overnight because it really gets those flavors down in the meat), at room temperature. Grill to desired.
3.How about some  Lemon-Garlic Grilled Eggplant

  • In a bowl mix
    • 1/4 cup oil
    • 4 cloves of garlic, minced
    • 2 drops of Lemon Vitality
    • 1 drop of Black Pepper Vitality
    • Salt to taste
  • Cut your eggplant in half and score the flesh until you have grids (this ensures the garlic and marinade gets all into those grooves and flavors the whole veggie). Combine the marinade ingredients. Spoon the marinade all over the eggplant and let rest for 5-10 minutes before grilling. Grill skin side down first and then flip to the flesh side. You shouldn't need to grill it for more than 5 minutes per side, at a med-high temperature. 


0
Powered by Blogger.
BloglovinEmailPinterestTPT