Get Ink'd #10- Note Card set

Tuesday, May 29, 2018
Hey Y'all!!

Today I am sharing a set of note cards that I made as a gift. I started with the Stampin' Up! note cards that are A1 size. These are perfect to give as set. Since they are a little smaller in size, making a box or "holder" is super easy too.

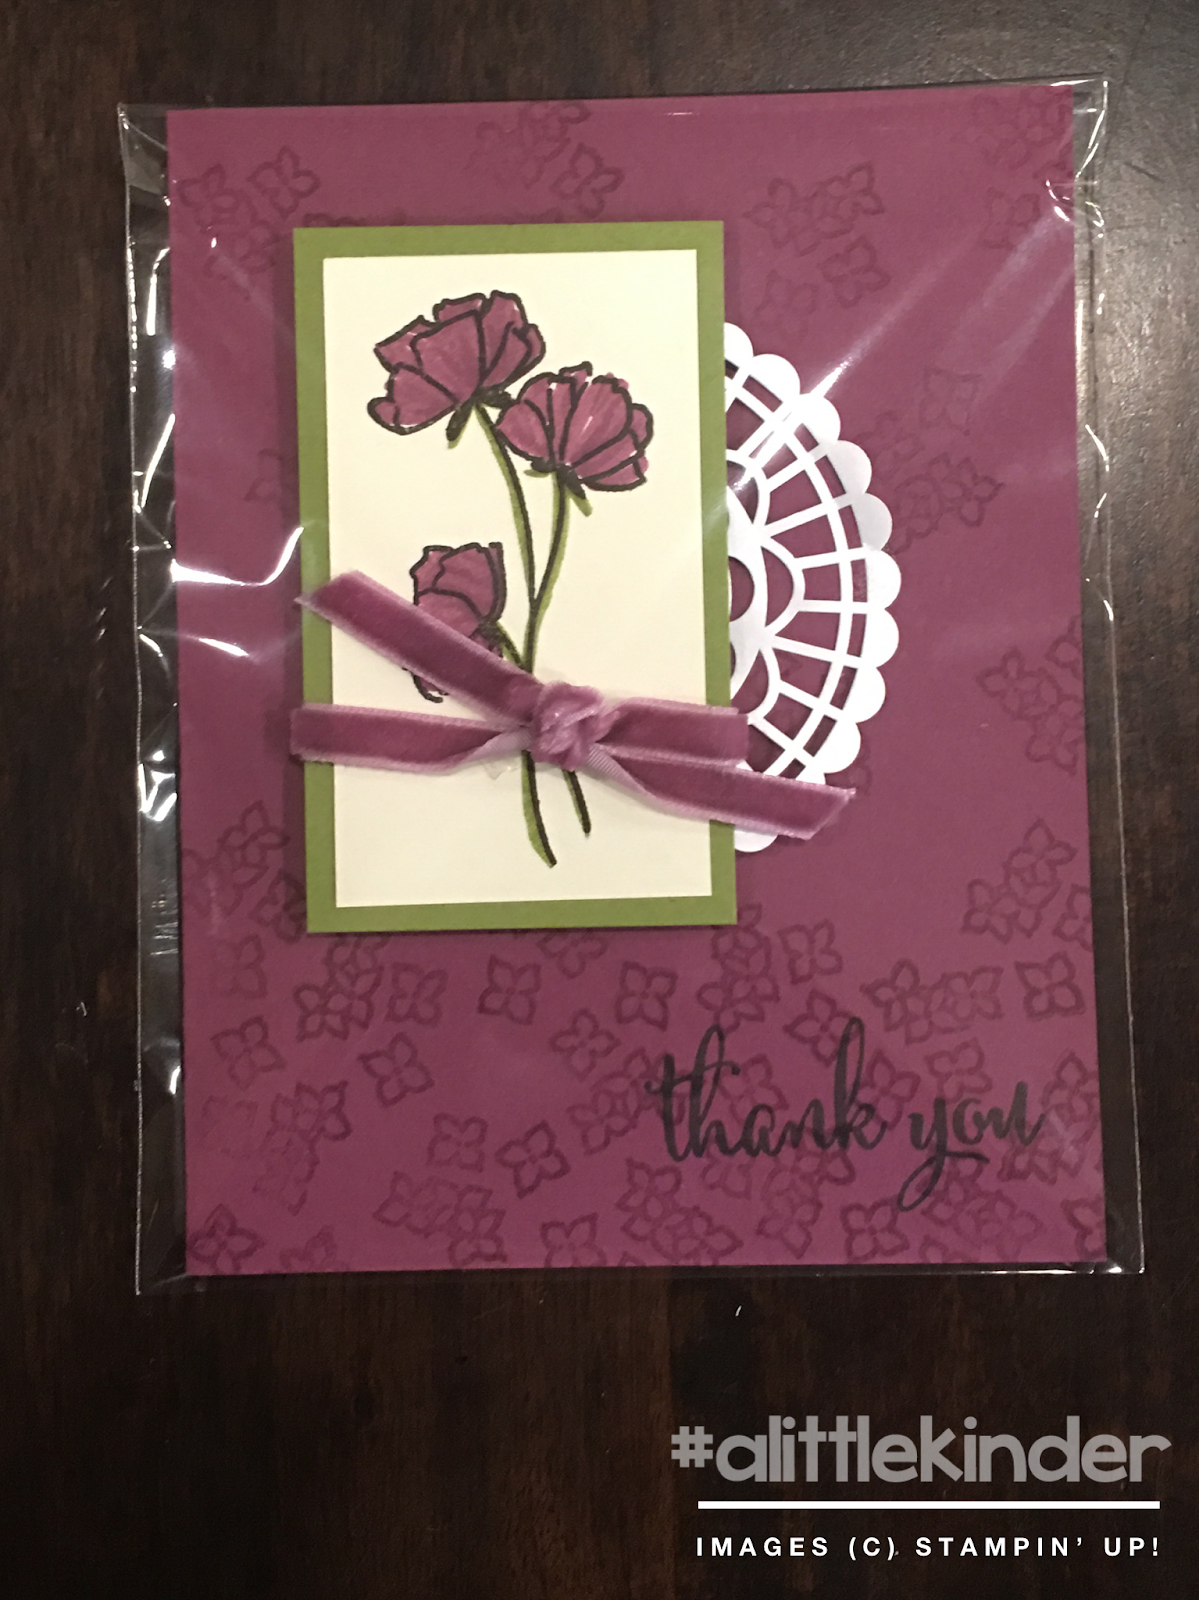
I started playing with the Varied Vases set and ended up with some super cute note cards. The paper colors are Rich Razzleberry and Crumb Cake. The paper is from the retiring Tutti Frutti DSP.


This is what all the note cards look like. This project was FAST! I used Wink of Stella on the flowers for a little pizzazz! I placed all the note cards and envelopes into a clear envelop and made a decorative band to go around them all.


So there it is, my super easy card set. I hope this card set inspired you to do something creative today! And if you LOVE LOVE LOVE that Tutti Frutti paper is on the discontinued list. Click on the picture in the supply list to take you to my store where you can order it (if it's still in stock).

Supplies:


I would LOVE to be your Stampin'Up! Demonstrator!


If you are in the United States and not currently working with a Stampin' Up! Demonstrator, you can order supplies in my online store, here.


0

Get Ink'd #9 Wonderful Card

Friday, May 25, 2018
Hey y'all!! I hope that you are enjoying warm weather where you are. It's about to be HOT... like center of the sun hot here in the south. Some days I feel like we skipped spring completely. I have just one week of teaching left until summer vacation. I have one big goal for this summer (besides enjoying every minute I can before we pack AC off to collage) and that is figure out how to do videos and start a YouTube channel to share more about the process! Any tips?

So today's card was inspired by our annual summer trip. This summer we are headed to the red wood forests. I am looking forward to spending time with my family and planning out blog posts! And this card gets me in the spirit!

I started out using a watercolor technique for making the background (see this would be a great video, right?) Then I stamped the large tree ring stamp in crumb cake then fussy cut it out. I used Stampin' Dimensionals to pop it up. I stamped the message in Old Olive and also fussy cut that. The parts that are on the tree ring are glued to the image, the parts hanging off have dimensionals under them as well. It just keeps everything on the same level.

This set also has a coordinating set of framelits called Nature's Roots. I didn't pre order those but now that I'm working with this set, I feel like I need them. Another really exciting thing is that this set looks WONDERFUL when used with the Lovely as a Tree set! 

Thank you for stopping by, I hope you are inspired to create something today! See ya' next time!

Supplies:


I would LOVE to be your Stampin'Up! Demonstrator!


If you are in the United States and not currently working with a Stampin' Up! Demonstrator, you can order supplies in my online store, here.


0

Get Ink'd #8 Wild about you!

Tuesday, May 22, 2018
Hey Y'all!!
Today's card is a baby card. I guess with graduation just days away I'm trying to channel "stay little". This card uses the Abstract Impressions set (147513) that will be available in June and A Little Wild (144344) that is caring over. When I first saw the Abstract Impressions set, I noticed to of the stamps screamed Cheetah print! I also knew that I wanted to make a card that used the "cheetah print" mixed with one of the adorable animal stamps that Stampin' Up! carries. And this is what I came up with!


 When I was first thinking about this card, I thought that I would stamp the message on the flag piece in Stampin' Up! white craft ink. I just didn't love it. It looked ok, only I did think that it fit the look of the card. So I stamped it in Blueberry Bushel on Whisper White and cut the words out. I like this better. The words "pop" in a what that they did not stamped in white.

The front facing elephant is raised up on dimensionals and I added Wink of Stella for a little sparkle. I hope that you were inspired to create something today! I know I will be playing more with the "cheetah" print look... maybe pink cheetah print.. or purple... or blue!

Supplies: 


I would LOVE to be your Stampin'Up! Demonstrator!


If you are in the United States and not currently working with a Stampin' Up! Demonstrator, you can order supplies in my online store, here.


0

Get Ink'd #7 Watercolor roses

Thursday, May 17, 2018
Hey Y'all!
I wanted to share a card made with one of the brand new 2018 Annual Catalog stamp sets. As a demonstrator, we got the chance to pre order 17 of the new sets!! You can get them now too by joining my team. For $99 you get to pick $125 in product including the pre order for the new catalog AND you get to see the new catalog before June 1! It's a great time to join.


When Anna Claire was about 2 years old, she had this ADORABLE outfit from Gap kids that was pink with dark pink sweetheart roses. I have always loved that pattern and recently found sheets for my bed too. So when I saw this set I knew EXACTLY what my first stamped card would be. Pink on pink sweetheart roses!


Another thing that is totally inspiring me right now is watercolors. Y'all years and years ago, when dinosaurs walked the planet I was an art major. Watercolor and mixed media were my art forms. It's been years since I painted anything, but I LOVE how water reacts to paper. Stampin' Up! has a great watercolor paper. It's on page 194 in the bottom right corner of the 2017 Annual Catalog. You get 5 sheets for $5. I have a tutorial coming on some of my favorite ways to use watercolor paper!


The background is Whisper White paper that I cut apart and layered on to a Powder Pink card base. I also die cut a "swirl" in Old Olive paper from the Swirly Scribbles Thinlits set. I used the biggest swirl. This is another item I seem to reach for over an over... my Big Shot and thinlits dies.


I added Wink of Stella over the watercolor roses and sequins for a sparkle! This was a really fun card to make. I hope you are inspired to create something today!

Products Used: 


I would LOVE to be your Stampin'Up! Demonstrator!


If you are in the United States and not currently working with a Stampin' Up! Demonstrator, you can order supplies in my online store, here.


0

Get Ink'd #6: For the Graduate

Tuesday, May 15, 2018

Hey y'all!!

Where has the month of May gone! On the 24th my oldest graduates from high school and man oh man is she excited. Me.. not so much. I'll be ok ;) Today's card is inspired by her graduation.

As a Stampin' Up! independent demonstrator, I had the opportunity to purchase some of the items that will be released with new Annual Catalog on June 1. Today's card uses one of the new hostess sets called Hand Delivered. I am in LOVE with this set!! Look at all the cuteness...for real this is a must have kind of set.

So here is the first card I made using this set. Yes I said first hehehe... there will be more!

This was super fun to make because of the coloring. I love to color. It's calming. I used the Stampin' Write Markers but honestly you could use the new Stampin' Blends. One of the reasons to use the Stampin' Blends is that you will not get the "lines" like you see on the skirt.  

Products Used:


I would LOVE to be your Stampin'Up! Demonstrator!


If you are in the United States and not currently working with a Stampin' Up! Demonstrator, you can order supplies in my online store, here.


0

Paper Pumpkin... oh my!!!

Monday, May 14, 2018
Hey y'all!!

I've gotta ask... do you LOVE monthly boxes? You know, monthly clothing boxes, monthly make up boxes, monthly jewelry boxes, and they even have one for dogs now! I've really never been a monthly subscription box person. I just haven't. I like to pick my things, touch them, feel them... make sure I have projects in mind. Yeah no I'm not big on surprises. My husband swears that I am the worst person to buy presents for because I am so picky! But that all changed when I got my first Paper Pumpkin box.

I bet that surprised you right? The queen of don't surprise me, loves Paper Pumpkin boxes that are a surprise every month. Well I do. Wanna know why?


  • Each month is like a personal challege to create something that might not be my style.
  • Exclusive Stamp set that you can't get anywhere else (what can I say... I like exclusive)
  • At least 1 Stampin' Spot ink pad per box (um hello free ink- and this size is PERFECT for traveling to classes or crops or for use with the Stamparatus)
  • I got a free D size block when I first signed up. 
  • You can make the project shown (there is a video tutorial if you want to stamp along) or you can do your own thing!
  • TONS of product. Ok not literal tons but in a kit that is centered around cards you get enough supplies to make at least 8 cards, AND at least half of the year will be card kits! (January 2018 kit contained product for 16 cards! September 2017 kit made 8 cards AND 9 pillow boxes)
  • Flexibility! Skip a month or cancel anytime. 
  • Access to past kits! For real... as a subscriber you can buy either full kits or "refills" (no ink or stamps in a refill) 
  • And the BEST reason of all.... June 2018 kit is going to coordinate with one of the BRAND NEW stamp sets!! 


 Order yours today!


I would LOVE to be your Stampin'Up! Demonstrator!


If you are in the United States and not currently working with a Stampin' Up! Demonstrator, you can order supplies in my online store, here.


0

Get Ink'd #5 Share what you love (Gotta have it all)

Sunday, May 13, 2018
Hey Y'all!
This was the suite that I purchased. I decided that it was truly the best value of any of the bundles. I love the mission statement stamp. Here are 4 cards that I made using the new DSP and the new Lovely Floral 3D Dynamic Textured Impressions Embossing Folder.

The Gotta Have it All Bundle is made up of: 

Stamp Sets:

  • Love What you do Stamp Set
  • Make a Difference Stamp Set
  • Statement of My Heart Single Stamp (Free with purchase),


Paper:

  • Very Vanilla Cardstock
  • Share What you Love Cardstock
  • Pearlized Doilies
  • Share What you Love DSP


Ink and Embellishments:

  • Grapefruit Grove Classic Stampin' Pad
  • Rich Razzleberry Velvet Ribbon
  • Share What you love Artisan Pearls
  • Lovely Floral Dynamic Textured Impressions Embossing Folder Very Vanilla (Free with purchase)
  • Share What you Love Embellishment Kit (Free with purchase). 


 Card Details:


  1. Start with Very Vanilla Card base (5 1/2" x 8 1/2") and emboss the Lovely Floral embossing folder. Tip: spray a little water on to cardstock to help loosen the fibers and get a better impression.
  2. Use sticky notes to mask off the embossed image. Leaving about 2" of card exposed at the bottom.
  3. Take the small leaf from the Love What you Do stamp set and stamp in Old Olive. Make sure you stamp over the sticky note with some images. 
  4. Add sentiment. I used "I'm Lucky to have a friend like you" one. 


  1. Start with Very Vanilla card base (5 1/2" x 8 1/2"). 
  2. Cut a 5 1/2" x 3" strip of DSP. I loved the page with what looks like watercolored images. The back of this paper is the Rich Razzleberry strip. You will need a 1/2" of a coordinating paper (mine is the Rich Razzleberry Stripe). 
  3. Cut a rectangle of Very Vanilla Cardstock 2" x 3". Layer it on top of a 4"x 3 1/2" rectangle of Old Olive. Tear the edge of the Old Olive paper. 
  4. Stamp and color one of the flower images. 
  5. Add one of the mini paper clips from the Share What You Love embellishment kit. 
  6. Stamp a sentiment. This one uses a cool technique that looks like ombre. Ink up your stamp and stamp it off. Then ink up half of the image again. The top part of the image is second generation and the bottom is full strength first generation stamping. 


  1. Start with a card base made from Mint Macaron (11"x 4 1/4"). This is a top folding card. 
  2. Cut a piece of Share What you Love DSP to 5 1/4 x 4". In a coordinating DSP cut a 1/2" strip. Layer these on to the card base.
  3. Cut a 2"x 3" rectangle of Very Vanilla cardstock. Stamp one of the flower images in Grapefruit Grove and the sentiment in Basic Black ink.
  4. Layer on to a rectangle of Rich Razzleberry cardstock (2 1/2" x 3 1/2"). Use Stampin' Dementials to pop up the sentiment. 


  1. Start with a card base of Rich Razzleberry cut to 5 1/2" x 5 1/4". Score at 1 1/4" from the left side. This is going to fold over the DSP.
  2. Cut a rectangle of DSP to 4 1/4 x 5 1/2". 
  3. Fold over the 1 1/4" flap and adhere to the DSP. 
  4. Cut out 2 ovals with the layering thinlets and the Big Shot. The smaller over is Very Vanilla and the larger oval is Mint Macaron. 
  5. Stamp the Statement of the Heart in Grapefruit Grove ink. 
  6. Layer on to card over one of the pearlite doilies. 
  7. Add a rose embellishment.

I would LOVE to be your Stampin'Up! Demonstrator!


If you are in the United States and not currently working with a Stampin' Up! Demonstrator, you can order supplies in my online store, here.


0

Get Ink'd #4: Share what you love (A Little More, Please)

Tuesday, May 1, 2018

Hey Y'all!
Today I'm sharing a few things that I made using the items in the A Little More, Please suite. This suite kicks things up by including embellishments,colored card stock, and the alphabet set call  "Make a Difference".  This set excites me because of the ability personalization options. Y'all this set also meets Stampin' Up! angel police that allows you to sell your hand stamped cards and items.

This first card uses Make a Difference for the sentiment. I have fallen in love with the simplicity of this card. The Very Vanilla cardstock was embossed with the Layered leaves embossing folder.  Then stamp one of the images down a 2 inch strip of Very Vanilla cardstock. To get the color on the edge, simply slide the paper edge over the top of your stamp pad. You don't have to press down hard at all. I added the words thank you in Basic Black.


The next card is simple up has a little pizzaz. The large flower image is stamped on to 1.5 inch squares. The bottom square is popped up with Stampin' Dimentionals and has some twine wrapped around it. You could use any small sentiment or stamp one with the letters from Make a Difference. The fun of this card is actuallly the Old Olive images on the left. I used a post it note to block off part of the card. I stamped first and second generation images (remember that's fancy words for stamped before re inking to get a lighter image) to create what looks like a Designer Paper.


Y'all I am not a girly girl and doilies... oh my, so not my thing. But the doilies that come with this suite aren't frilly or old fashioned. They are pearlized and have more of a stained glass feel.  They grew on me! LOL! Actually they sat on my table saying... Use me. I'm fun. (What your craft supplies don't speak???) I needed a little something with this card. The Rich Razzleberry cardstock is stamped with Versamark ink. I stamped the images closer together at the bottom and spread them out more at the top. I stamped the large flower image on Very Vanilla paper and used the Stampin' Write markers to fill them in (you could have used the Stampin' Blends markers if you were lucky enough to get them during Sell-a-bration.) Then I added the velvet ribbon (lushish yall!!) and it STILL needed something. So I started playing with the doilies. I like the feel that they added.


I realize I shouldn't have favorites. I mean it just isn't fair to all the other cards I made but y'all!!! This card is just all that and some! Let's talk about making this card. I knew I wanted to show 4 cards with this set but I was stuck at 3. AND I really hadn't used much from the embelishment box. So I dumped everything out on my work area. I picked up this and I picked up that and then I wondered if the large tag was big enough for the large flower image. So I stamped it. IF you as my pre school students they will tell you my favorite color is pink. And that is truth. I love pink but I wanted to something with the Grapefruit Grove color and honestly the cardstock wasn't doing much talking to me. So I watercolored the flowers and stamped the word beautiful. Added a little knot of the velvet ribbon and some Stampin' Dimentionals and BAM!


There you have it. My take on the A little More, Please suite. For a set that I wasn't sure I would love, I am really having fun creating with it! The next Get Ink'd will focus on cards made with the Gotta Have it all Suite. And there will be a 3D Get Ink'd using this set as well. I told you I warmed up to the set and actually have enjoyed stamping with these images.


I would LOVE to be your Stampin'Up! Demonstrator!


If you are in the United States and not currently working with a Stampin' Up! Demonstrator, you can order supplies in my online store, here.


0
Powered by Blogger.
BloglovinEmailPinterestTPT