The Spot Creative Challenge #121 It's a sketch challenge

Tuesday, July 28, 2020
Hey Y'all!
This week the team over at The Spot has a sketch challenge for you. And I think you are going to like this one!
Today's sketch is bold. It features a diagonal line to draw you across the card. What I love about this sketch is that you can change the orientation of the fold and still get a bold and stunning card. Here is my card....
I made a baby girl card with this design. But the themes are endless! Let's dive into what I did with this card.

Details for today's card


Let's start with the big picture. I made a top folding card base from Blushing Bride cardstock. Next I have 2 layers of Whisper White cardstock (we will get into this in a second). Then there is a vellum die cut heart with the bunny image and greeting. I colored some rhinestone gems with Flirty Flamingo and there is my card. Now let's take a closer look!

Above I mentioned that I used 2 layers of Whisper White cardstock to make the front of the card. The first layer is 4"x 5 1/4". The second was cut at 4"x 4 1/4". This is the layer that I cut the diagonal on. This is also the layer  that I ran through the embossing machine using the swiss dot looking folder from the Wrapped in Textures Embossing Folders from the new August to December Mini Catalog. 

Here is where this card gets it's wow. The diagonal. Once I had cut the 4"x 4 1/4" piece so that it had a diagonal cut, I used a pencil to trace my cuts on to the larger Whisper White Piece. Then I used 1/4" pieces of just about every pink that Stampin' Up! has. When I was making this card I realized that I did not have the 6x6" Designer Series Paper Assortment in the 2019-2021 In Colors so there is no Rococo Rose in this card. I decided to use the word piece from these paper packs. My strips are 1/4" x 1 1/2". Using my pencil line I glued down the strips in the same order, over and over, until the diagonal was covered. I embossed the two halves of the top piece of Whisper White card stock and then used Stampin' Dimentionals to lift this layer. The sweet bunnies are from the Wildly Happy stamp set. To add a little something' to the greeting, I stamped a heart from Birds & Branches stamp set. Honestly any small heart would work. That just happened to be the one I had handy. I layered the bunnies and sentiment onto a vellum heart. This works to anchor the image but doesn't take away from the card. And finally I added the rhinestone gems that I had colored with the Flirty Flamingo Blends. 


Are you in the United States? I would LOVE to be your Stampin'Up! Demonstrator!


If you are in the United States and not currently working with a Stampin' Up! Demonstrator, you can order supplies in my online store, here.


0

The Spot Challenge #120 Christmas in July

Tuesday, July 21, 2020
Hey Y'all!

Can you believe that this week we are challenging you to make a Christmas card? Back to school or fall, even a Halloween card doesn't seem as out of place as Christmas in July. I guess it would help if it actually felt like July and not some random weird month. This Corona-cation stuff just has me all out of wack. But the challenge has been accepted and today I am sharing, along with the talented team over at The Spot Creative challenge, Christmas cards. I really hope that you join us and share your creation. Click on the picture below for all the details (you don't have to have a blog to play- just a beautiful creation that matches the theme of Christmas). 


Here is my card. This suite was the fist one that took my breath away when I saw the new catalog. The suite is called "Trimming the Town". It has a beautiful color pallet of Poppy Parade, Old Olive, Misty Moonlight, Pool Party, and Early Espresso. 


I started with the DSP for my card. I LOVE the prints on this paper. They are stunning. Once side is some kind of pattern and the flip side is full of images (like the little houses in this card). I love the red and green with blue color scheme. It makes the card pop.


I used the die cuts to cut out the car and tree. Then I colored the stamped images with Blends. So we have a family joke at our house about the size of a tree. I live in a tiny 900 square foot house but evidently I ALWAYS fall in love with the biggest tree on the lot. I want a big full tree without holes. No Charlie Brown trees here. And I can't seem to tell that the tree is too big at the tree lot. When we get it home we have to trim, trim, trim until it fits the house. Every year I promise to do better, every year we have to trim. I decided to use the larger of the two tree images because of our family joke. I just giggle seeing that HUGE tree on the little car. Both of my kids and my husband noticed and mentioned our tree issue when they saw this card. I love being able to include things that the card recipient will notice and smile at. 

I really hope that you join our challenge and add your card by Saturday. It's so much fun to see everyone's cards and projects. But more than anything I hope that you were inspired to create a little kindness, one card at a time.

Products Used:


Are you in the United States? I would LOVE to be your Stampin'Up! Demonstrator!


If you are in the United States and not currently working with a Stampin' Up! Demonstrator, you can order supplies in my online store, here.


1

The Spot Creative Challenge #119 A color challenge!

Tuesday, July 14, 2020
Hey Y'all!
Today we are playing with color! I love a good color challenge and the team over at The Spot Creative Challenge has one for you. Did you know you too can play along (and you don't have to have a blog either!)?  Click on the challenge image blow to add your photo.

I am in love with Magenta Madness with Pool Party. They are stunning together. Add a little black and POW! Now let's talk about gold. It's not my color. Like for real... I don't use gold and I don't wear gold jewelry. I'm a rose gold or silver girl. No splitting hairs about rose gold. It doesn't have the yellow undertone and that is what I try to stay clear of. Now my card!


Have you seen the Zoo Globe stamp set?  I am in love with these little zoo animals. The set was made so that you can use the snow globe shakers with this set, but I see the animals being free! 


Here is a close up of my card. I love to layer my cards. Sometimes it layers of DSP and cardstock, sometimes it's layers to create a focal space (like on this card). I knew the background was busy in this card. The feel I was going for was circus tent-ish. I layered a Whisper White label layer under a vellum cardstock layer and then added my images. 

Details for today's card

Measurements:
  • Basic Black card base 
  • Largest of the tall skinny triangles from the Stitched Triangle Dies
  • Whisper White Hippo and Friends Dies

I hope to see what you create over at The Spot creative challenge blog. You don't have to have a blog to participate, just a picture! Until next week, I hope I've inspire you to create a little kindness one card at a time!

Are you in the United States? I would LOVE to be your Stampin'Up! Demonstrator!


If you are in the United States and not currently working with a Stampin' Up! Demonstrator, you can order supplies in my online store, here.


1

Kylie's International Blog hop July 2020

Monday, July 13, 2020

Hey Y'all!
Welcome to Kylie's International Blog hop! Today I am sharing a card I created using a new suite from the August- December Mini Catalog. The Suite is called Snowflake Splendor and it was at the top of my must have list! There are so many different pieces in this suite; stamps, dies, an embossing folder, slimmer paper(read that as GLITTER paper!), gems, ribbon, and DSP (our name for pattern paper). Not to mention that the colors are AMAZING! 


See! They are amazing!! I love how easy it is going to be to pull a few of the colors and make fantastic cards and gifts. Here is my card. I LOVE how it turned out. With the beautiful DSP, I only stamped the greeting on this card. 


Let's take a closer look at the sentiment area. This area is all about layers. I layered the Metallic Mesh Ribbon from the Magic in this Night suite, and it was perfect! I love how it's giving this card a broken ice type feel. And I layered lots of vellum die cuts with some in the new Balmy Blue Glimmer Paper. 


The final touch is the gems from this suite. There are two colors and I decided that I liked the darker one with the Balmy Blue and vellum snowflake die cuts. 

Details for today's card

Measurements:
  • Balmy Blue card base (top fold), 4 1/4"x 5 1/2", scored at 5 1/2"
  • DSP layer 4x 5 1/4"
  • Balmy Blue layer 3-3/8"x 4-5/8"
  • DSP layer 3-1/4"x 4-1/2"
  • Balmy Blue Glimmer Paper and Vellum Cardstock for die cut snowflakes


Are you in the United States? I would LOVE to be your Stampin'Up! Demonstrator!


If you are in the United States and not currently working with a Stampin' Up! Demonstrator, you can order supplies in my online store, here.

10

OSAT Blog Hop Pretty in Pink

Thursday, July 9, 2020
Today I am joining the amazing team at OSAT for a blog hop. Our theme is "Pretty in Pink" and man oh man did it take me back to the "brat pack" movies of the 80's. I love them all, and I day dreamed being part of the brat pack. Do you have a favorite one? Nope I can't pick just one either.


Today's projects embrace everything I think of when I think of the Brat Pack movies... love, fun, being different, standing out, but never loosing yourself. Ok I'll step away from the deep end lol! The Zany Zebra set is just plan fun. Add some pink and you have a party on paper! I love a good "window" card where some adorable animal pokes it's head out. For this card I used the Stitched Stars dies to make my windows. The background is stamped in both Basic Gray and Magenta Madness ink that I stamped off on scrap paper.


The companion to this card is an ADORABLE mini treat bag! I picture a pre teen girl's birthday party where these are the party favors. The bags are big enough to hold a mini nail polish, a mini nail file and some candy.


I hope that you enjoyed my take on Pretty in Pink and are inspired to create your own projects. Don't miss out on ANY of the great things that were created for this hop! Use the links below to see what the team came up with! Until next time, create a little Kindness one card at a time!


Products Used:


Are you in the United States? I would LOVE to be your Stampin'Up! Demonstrator!


If you are in the United States and not currently working with a Stampin' Up! Demonstrator, you can order supplies in my online store, here.


2

New at SU- Go Bananas with Bumble Bee a 2020- 2022 In Color

Wednesday, July 8, 2020


Welcome to our NEW AT SU! Blog hop! Today I am joining a group of Stampin’ Up! demonstrators from around the world who are Hoppin’ with creative paper crafting ideas to share with you. I am showcasing the new Bumble Bee 2020-2022 In Color in my projects. Don't forget to keep hopping with us by using the "Next" button below my projects and descriptions!

Bumble Bee was the first of the new In Colors that we were introduced to back in March when the Ornate Garden Suite was released. To be honest, I wasn't sure if it was going to be a color I liked. It felt very 70's. It's a warm yellow but bright without being fluorescent. In the Ornate Garden suite, it is paired with colors like Old Olive, Early Espresso, and Terracotta Tile. The more I work with this color the more I realized that it has so much more to give! While I love a good retro vibe, I also love a color that transcends and can be used across many different applications. If you are familiar with the Ornate Garden Suite then you will quickly see how vastly different Bumble Bee looks in my projects.


Today I have made 2 different projects for you, a card and a cute little box. I love the whimsy of these two projects. The step by step directions for the box project are in a downloadable PDF and I made a video as well. The stamps I used are also new in the 2020-2021 catalog. They are the Cute Fruit set in the Beginning Brochure (ask you demonstrator for one- or if you don't have a demonstrator I can help). I love the Beginning Brochure this year. It features the Cute Fruit set, along with the Zany Zebras and a set that coordinates with the Jar of Flowers set. It really isn't just for those starting out!


Details for today's card


Ok, let's talk about this card! I don't know how you can look at it and not smile! The day I created it, life felt absolutely bananas. Nothing seemed right or even real. In those times, I retreat to my stamping corner and create. Sometimes I just put together a Paper Pumpkin kit, other times you get cards like this. I focused on the yellow that is Bumble Bee. It's so bright but has depth to it! I added a little Cinnamon Cider for the stems and Tuxedo Black Memento ink for the face and greeting. The card is a standard 4 1/4"x 5 1/2" top fold. I layered Bumble Bee Cardstock (4"x5 1/4") behind a piece of Whisper White (3 3/4"x 5"). I knew I didn't want to fill the background with bananas, I wanted some white space at the bottom. I added the face and "smile" into the lower right hand corner. 

Now the box I made is probably my favorite and easiest box that I make. It's really not a box but more of a belly band around a tub. Boxes to me have lids and are all one piece. This one is not. See the video below on how to make it. 


In the picture below you can see how the box pulls out like a drawer, rather than having a lid that is attached. This box is fairly big, it can hold candy or even one of the Bath and Body hand sanitizers (with ample room around it).


Measurements:
Belly Band (outer part of box): 8"x 3 1/8" score on the 8" side at 2 1/2", 3 5/8", 5 3/4", and 7 1/4" Whisper white rectangle on the band is 2 7/8" x 1 3/4"

Box: 6"x5" score each side at 1 1/2"


Please contact your Stampin’ Up! demonstrator if you have any questions or to make a product purchase. I would be happy to answer any questions about products or the techniques shown here. If you do not have a demonstrator, you can use the below link to order products from me or join my family of happy shoppers and demonstrators. 

Products Used:


7

The Spot Challenge #118 Creating your Own DSP

Tuesday, July 7, 2020


It's Tuesday and you know what that means! It's another The Spot challenge. This week we are creating our own DSP (Designer Series Paper).  For my contribution, I used a returning stamp set called Harvest Hellos. I love this cute set and the matching punch. I didn't use the punch since I was stamping my DSP.


I started with a fill sheet of 81/2"x 11" Whisper White paper. Using Tuxedo Black ink, I stamped the pumpkin and stems. I turned my stamp a quarter turn each time. Then I colored with Stampin' Write markers. I let the markers help me by making lines. Had I chosen to use Blends, the lines would not have appeared but would have had a smooth round blend effect. I feel that look was better suited for the apple rather than a pumpkin that has lines as part of it's texture. Once I colored the whole sheet, I added a watercolor wash of Misty Moonlight in the white space around the pumpkins. I let this be supper rough and messy.


To finish the card, I layered a Whisper White strip over a 2" circle of Vellum Cardstock. Then I attached them to my card over some of the new 3/8" Embroidered Ribbon. To complete the look, I added some stars from the All The Trimmings embellishment pack.


I am really happy with how my card ended up looking on the layers of Cajun Craze and Misty Moonlight cardstock. I did place Whisper White on the inside of the card, Cajun Craze is on the edge of being to dark to write a message on. I hope that you are inspired to create your own background paper! It's really fun to do and creates some stunning one of a kind cards! Until next time.... create a little Kindness one card at a time!


Products Used:


Are you in the United States? I would LOVE to be your Stampin'Up! Demonstrator!


If you are in the United States and not currently working with a Stampin' Up! Demonstrator, you can order supplies in my online store, here.


0

Happy First of July!

Wednesday, July 1, 2020
Hey Y'all!!

Have you seen the meme that tells July to come in and have a seat, because we don't want any trouble from the month? I'm so feeling that way! I am very much ready to have thing settle down. We have fallen into a nice rhythm here. Our pace I like, the family together for dinners. But part of me is also tired of the family... ya know, all the togetherness is getting to be a lot. LOL!

Each Monday I share a video over on Facebook called Maker's Monday. I create something around a stamp set, product suite, or theme. Usually it's 2-4 cards and projects, but it can be more or less based on the complexity. This week I shared a super cute idea for your Fourth of July gatherings (if you are having one).


Isn't this cute?? I love the basic idea and can see it used on all kinds of "stick" like items. How cute would this be on the stem of a sparkler? Or how about on a drinking straw? Or what if you took this star and added it to place cards that marked the food or spots of people?

Details for today's card

The star embellishment was so easy to create and honestly would be easy to create lots of in a single setting.  I used the Stitched Star dies and the Playful Alphabet dies. I mixed Night of Navy Cardstock with the dot paper from the Brights Family DSP. Add a little adhesive and the treat is ready to go!

Products Used:


Are you in the United States? I would LOVE to be your Stampin'Up! Demonstrator!


If you are in the United States and not currently working with a Stampin' Up! Demonstrator, you can order supplies in my online store, here.


0

Paper Pumpkin... Beyond the Box


Hey y'all!!
I love June's Paper Pumpkin. But now that the hype is over, what are you going to do with the stamp set? I got to thinking about all these beautiful stamp sets that I get month after month. I have quite a collection now. How about you?

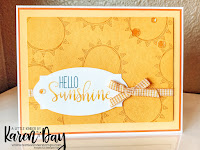
Today I am bringing you several cards that I made with the stamp set from June's Paper Pumpkin kit and a some supplies from the Annual Catalog. The idea here is that you created all the beautiful cards that were planned with the kit, and maybe made some alternatives made with the left over supplies (because we know there are ALWAYS extra) and now you are left with just the stamp set. I really think that Paper Pumpkin is the best way to get started in card making. Each month you get everything you would need to make that months box. The only item that you would need are scissors.

June's Paper Pumpkin box was called Box of Sunshine. And these are my cards that are meant to go beyond the box!


Details for today's card

These 4 cards were all create with the same basic supplies- Bumble Bee, Crushed Curry, Pumpkin Pie, and Mango Melody inks; Bumble Bee, Terra Cotta Tile, and Whisper White paper; Tuxedo Black Memento ink; ribbons and sequins.  Each card uses the sun stamp in some way, and I used my favorite greeting stamps from the set. The sequins are from the Artistry Blooms Sequins.

Products Used:


Are you in the United States? I would LOVE to be your Stampin'Up! Demonstrator!


If you are in the United States and not currently working with a Stampin' Up! Demonstrator, you can order supplies in my online store, here.


0
Powered by Blogger.
BloglovinEmailPinterestTPT