The Spot Sketch Challenge #117

Tuesday, June 30, 2020
Hey Y'all!
I am so excited to let you in on a little secret I've been holding. Today I am officially joining The Spot Design Team. There is so much talent on the team with Stampin' Up! demonstrators from all over the world!! Each Tuesday I will be sharing my take on the challenge of the week. The best part is that you can participate too! Head over to the blog, The Spot Creative Challenge and show us your use of this sketch!


That's a great sketch right? I love how this sketch gives you lots of room to interpret it. I decided to make the square one of the new label shapes from the Hippo and Friends die set (this is a MUST have  set). Between the rain and the dust clouds, I have been feeling so meh and this little sloth and his "sigh" are the cutest way I know to show meh.


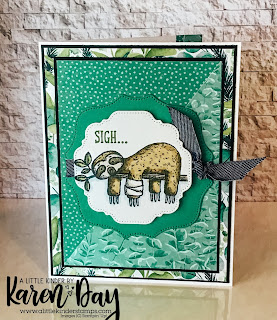
Let's talk color combinations. One of my favorite things that Stampin' Up! does is giving us amazing color combinations in the Designer Series Paper. Those color combinations can be used with any stamp set! My color inspiration came from the Forever Greenery suite. If you look close, you will see that I actually used pattern papers from another suite too, the Flowers for Every Season pack of DSP has that really great Just Jade dot and what I am calling eucalyptus leaf paper.  I used Basic Black to help separate all those patterns, just a hint mind you. The label dies from the Hippo and Friends dies are so unique, while the coordinate they do not match perfectly. They look beautiful layered together but they aren't matchy matchy. Love that! I used some Denim ribbon to mimic the tied wrap on the sloth, who by the way is colored with Stampin' Blends.

Y'all!! I can not wait to see what you make. You have until Saturday to create and post your card over  at The Spot. Click the sketch below to be take over to the spot!


Products Used:


Are you in the United States? I would LOVE to be your Stampin'Up! Demonstrator!


If you are in the United States and not currently working with a Stampin' Up! Demonstrator, you can order supplies in my online store, here.


0

Get Ink'd- Sunflower Faux Watercolor style card

Friday, June 26, 2020
Hey Y'all!
 Today I am sharing a card made with the Celebrate Sunflower set. This set is a bundle that can be part of the Pick a Bundle Starter Kit Promotion. During June (June 30 is the LAST DAY) anyone who purchases a starter kit gets to pick 1 bundle in addition to their kit. For transparency, the kit is $99 US plus tax but you get to pick $125 in products that YOU want or love. No pre fab kits here, but I can totally help you pick and choose. :) I love to shop!


Ok, let's take a look at today's cards. These look like they have been watercolored right? They are not. I used the Stampin' Blends to create a scratchy, scribbled look that mimics watercoloring because of the layers of ink and white spaces.


Another thing that I want to point out with this card is the sentiment flag. I started with a Whisper White flag. Then there is a scrap of Misty Moonlight and a scallop cut piece of Basic Black. I love the look of flags as the place where the greeting goes, but sometimes I want to fancy that space up. So what happens when the card is "busy" and you really don't need a bunch of ribbon? This is a perfect way to add that little something to a card without over powering the beautiful stamped sunflowers.

Details for today's card

Measurements:

  • Whisper White Thick Card base- 5 1/2" x 8 1/2" folded at 4 1/4"
  • Misty Moonlight 5 3/8"x 4 1/8"
  • Whisper White layer (this is where I stamped) 5 1/4" x 4"
  • scrap pieces of Whisper White, Misty Moonlight, and Basic Black

Products Used:


You can now follow my blog by email! Yep... brand new posts in your inbox!

Are you in the United States? I would LOVE to be your Stampin'Up! Demonstrator!


If you are in the United States and not currently working with a Stampin' Up! Demonstrator, you can order supplies in my online store, here.


0

Get Ink'd a Painters Tape Technique featuring Field of Flowers Stamp set

Thursday, June 25, 2020
Hey y'all!
Today I am sharing a fun technique with you. This one I'm calling the Painters Tape technique. I will caution you, not all painters tape is the same. For this to really work and work well without damaging the front of your card you really need the Delicate Surface Purple tape by Scotch. Even using this tape I will take off some of the sticky by laying the tape on my arm and then using it on my project. This card features the Field Of Flowers stamp set. I used Pear Pizzazz cardstock and ink to make this simple but eye catching card.


Let's talk for a second about how to make this card. About 2/3 of the way up from the bottom of the card I placed the painters tape. This is the white section of this card. I then used Pear Pizzazz ink to blend a background. There are all types of tools out there for this process. My favorite is either the sponge daubers for small areas or the make up brush tool for the larger area. Once I laid down some ink, I came back and stamped the grass image over the edge of the purple tape. Once both sides had been stamped, I pulled up that painters purple tape- VERY carefully. Don't rush pulling the tape. Once it was up I stamped the Always my friend in Tuxedo Black ink. I added a few flower shaped sequins and layered the card on Pear Pizzazz and Whisper White cardstock.

Details for today's card

Measurements:

  • Whisper White Thick cardstock base 5 1/2"x 8 1/2" scored at 4 1/4"
  • Pear Pizzazz cardstock cut to 5 1/4"x 4"
  • Whisper White cardstock cut to 5 1/8"x 3 7/8" (this is the layer I stamped on)
  • retired Butterfly Gala sequins
  • Delicate Surface Painters tape

Products Used:


One last thing, This month- the month of June- Stampin'Up! has two great promos going on. The first is for someone who hosts. When your workshop reaches $250 you will be adding an additional $25 in host rewards! As if that wasn't great, the second promo is even better!


Stampin' Up! is adding a free bundle to each starter kit this month! What does that mean? Well the already great starter kit of $125 worth of products that YOU pick for $99 plus tax gets an extra product bundle added that YOU pick! I would love to have you join my team of happy shoppers and demonstrators this month. To join my Stampin’ Up!® Team - https://KarenDay.stampinup.net click on the Join button at the top.

You can now follow my blog by email! Yep... brand new posts in your inbox!

Are you in the United States? I would LOVE to be your Stampin'Up! Demonstrator!


If you are in the United States and not currently working with a Stampin' Up! Demonstrator, you can order supplies in my online store, here.


0

Get Ink'd Tasteful Touches Card

Wednesday, June 24, 2020
Hey Y'all!

Today I am sharing a card made with the Tasteful Touches Bundle. This was part of the demonstrator pre order and I fell in love with the dies! They are simply a must have. And with this months Pick a Bundle bonus, this would be a great bundle to add to your starter kit (more about that at the bottom of this post). 

To color the flower images, I used sponge daubers. The centers are sponged in Rococo Rose and the outer petals are Blushing Bride. I stamped the image in Tuxedo Black Memento ink. And fuzzy cut them out for my card. The beautiful papers are all from the In Good Taste suite. I love the mixture of photogratic papers in this pack- wood, tile, textiles, and canvas. It really is a unique set of papers and it's a HUGE pack of 24 sheets! I added a few rhinestones and a greeting and this card is perfect!

Details for today's card


  • Card base- side fold 5 1/2" x 8 1/2" Whisper White cardstock folded at 4 1/4"
  • Grey layer of DSP cut at  4 1/8"x 5 3/8"
  • Navy layer of DSP cut at 3 3/4"x 5"
  • Tile layer of DSP cut at 2 7/8" x 4 1/8"

Products Used:


One last thing, This month- the month of June- Stampin'Up! has two great promos going on. The first is for someone who hosts. When your workshop reaches $250 you will be adding an additional $25 in host rewards! As if that wasn't great, the second promo is even better!


Stampin' Up! is adding a free bundle to each starter kit this month! What does that mean? Well the already great starter kit of $125 worth of products that YOU pick for $99 plus tax gets an extra product bundle added that YOU pick! I would love to have you join my team of happy shoppers and demonstrators this month. To join my Stampin’ Up!® Team - https://KarenDay.stampinup.net click on the Join button at the top.

You can now follow my blog by email! Yep... brand new posts in your inbox!

Are you in the United States? I would LOVE to be your Stampin'Up! Demonstrator!


If you are in the United States and not currently working with a Stampin' Up! Demonstrator, you can order supplies in my online store, here.


0

Maker's Monday- Beyond the box

Monday, June 22, 2020
Hey Y'all!
Today I am bring you 3 adorable projects that extend the life of your Simply Citrus kit. Last week I shared a video unboxing the Simply Citrus kit and included 4 cards made with just the stamp set. As much as I tried to put that stamp set away and move on to my next projects, it kept calling me back. For Maker's Monday today I am sharing 3 more projects using just the stamps from the Simply Citrus kit. I am mixing in a few other of my favorite stamp sets but really my focus is giving the Simply Citrus stamps a life beyond the box!


I LOVE this card!! It's going to be my swap card for July with my stamping team. I love the black and white against the Magenta Madness. The label is from the Hippo and Friends set (Y'all need to give this bundle a second look!). The mason jar is full of pink lemonade and a pink straw! I stamped the lemons and leaves from the Simply Citrus set and use the greeting "just a note". The background is embossed with the Pinewood Planks 3D embossing folder. If summer could be a card THIS would be it!


 This is a stepped down version of the first card. I love the simplicity of this one! The Buffalo Check background stamp has been a favorite since it came out. I stamped it in Magenta Madness for this card. Added the jar of pink lemonade- something very southern to drinking from a mason jar! Some ribbon and rhinestones and bam! LOVE this card.


I am freaking out about this last project!! Rather than pink lemonade I went with Bumble Bee but y'all! This is so cute. Can't you see dropping these in the chair or on the desks of the people you work with? A little pack of those drink mixes in a lemonade flavor and you have an adorable treat! This is SO easy to make, even though I fought and fought with getting the template right. I was over thinking it. This is just a strip of paper that is 1 1/2"x 6" long. On the long side you score at 1/4", 3/4", 3", and 3 1/2". I used a 1/2" circle punch to make an oval-ish opening for the drink mix to slide into. Some ribbon at the top and a cute tag featuring the lemons and it's done! I swear I am going to make a TON of these for when we go back to school. The Dollar Store has the boxes of lemonade packets so the cost will be super cheep.


I hope that you like these projects as much as I do. Use the links below to order the supplies you need to make your own projects. Click on the image below to download the free PDF sheet.

Products Used:


Are you in the United States? I would LOVE to be your Stampin'Up! Demonstrator!


If you are in the United States and not currently working with a Stampin' Up! Demonstrator, you can order supplies in my online store, here.


0

Get Ink'd with Bumble Bee!

Friday, June 19, 2020
Hey Y'all!
Today I am sharing 2 different versions of the split card technique. Both of these cards feature the new In Color called Bumble Bee and the Jar of Flowers stamp set. The card design is the same on both, on the flowers are different. Honestly, I love this about creating cards. I can design a layout and then use different stamps and colors to make multiples quickly. I also find going back to a card design that I love helps drive away any creative block that I have.


This first card uses the sunflower stamp from the Jar of Love set. I love how these stamps can be used with the jar stamp or they can be used on their own. 


Details for today's card

Measurements:

  • Card base- 5 1/2"x 8 1/2" Bumble Bee card stock scored at 4 1/4"
  • Whisper white layer (this is where I stamped the split card technique. YouTube video HERE)
  • Bumble Bee 6x6 Designer Series paper cute with a 2" circle punch
  • Scraps of Petal Pink and Basic Black

Products Used:


One last thing, This month- the month of June- Stampin'Up! has two great promos going on. The first is for someone who hosts. When your workshop reaches $250 you will be adding an additional $25 in host rewards! As if that wasn't great, the second promo is even better!


Stampin' Up! is adding a free bundle to each starter kit this month! What does that mean? Well the already great starter kit of $125 worth of products that YOU pick for $99 plus tax gets an extra product bundle added that YOU pick! I would love to have you join my team of happy shoppers and demonstrators this month. To join my Stampin’ Up!® Team - https://KarenDay.stampinup.net click on the Join button at the top.

You can now follow my blog by email! Yep... brand new posts in your inbox!

Are you in the United States? I would LOVE to be your Stampin'Up! Demonstrator!


If you are in the United States and not currently working with a Stampin' Up! Demonstrator, you can order supplies in my online store, here.


0

Unboxing the new Simply Citrus card details

Thursday, June 18, 2020
Hey Y'all!
Today I am sharing the unboxing video and the cards I made using the Simply Citrus Kit. This kit makes 3 full size cards in 5 different designs, but what happens after you have made all those cards? You are left with a great stamp set (with some of my most favorite greetings from this years catalog). Today I am showing you some of the cards I made using that stamp set.


Unboxing and card making video:


Details for today's card

All of today's cards are made using the measurements below.

  • Card bases (Whisper White and Garden Green): Side fold- 5 1/2" x 8 1/2" folded at 4 1/4", top fold cards are 4 1/4" x 11" folded at 5 1/2"
  • Fluid 100 water color paper cut to 4"x 5 1/4"
  • Whisper White paper cut to 4"x 5 1/4", additional scraps for stamping and cutting out lemons and leaves
  • Bumble Bee cardstock cut to 4 1/8"x 5 3/8"

Products Used:


You can now follow my blog by email! Yep... brand new posts in your inbox!

Are you in the United States? I would LOVE to be your Stampin'Up! Demonstrator!


If you are in the United States and not currently working with a Stampin' Up! Demonstrator, you can order supplies in my online store, here.


0

Water Color Resist Technique cards

Tuesday, June 16, 2020
Hey Y'all!!

Today I am playing with water! Well more specifically, I am turning my Stampin' Up! ink pads into water color paint.

I use the Fluid 100 water color paper from Stampin' Up! on this project. I really like this paper. I have several brands of watercolor paper that I like, this is one of my favorites. To start I took the largest sunflower image from the Celebrate Sunflowers stamp set and embossed it with clear embossing powder. While I could have used white, I felt that the clear would be less harsh when the project was finished.

Once embossed, I added a few drops of reinker to a large clear mount block (the F block and it measures 4 7/8"x 6"0. Then I used a spritz bottle to "wet" my paper. Water coloring is meant to be wet so don't be afraid to get the paper wet before you start. If you are worried about the paper curling, you can use painters tape to hold it down. I used a water painter brush and added color to the wet paper. I allowed the ink to move and pool in the stamped images. After I had colored the flowers I added a wash of Seaside Spray to the background. The final step was to stamp the sunflowers again with Staz On ink. I picked this ink because I wanted the black images to stay on the embossed images giving them the feel of being in front of the other flowers.


To create the card, I cut the panel in half to create two card fronts. I mounted those on Basic Black Cardstock. 


The best part of creating a unique background like this is that no two cards will look the same.  While I placed the watercolor panel onto the card base in the exact same position, the actual stamped images dictated the orientation of the card. Here are the finished cards. 


Products Used:


One last thing, This month- the month of June- Stampin'Up! has two great promos going on. The first is for someone who hosts. When your workshop reaches $250 you will be adding an additional $25 in host rewards! As if that wasn't great, the second promo is even better!


Stampin' Up! is adding a free bundle to each starter kit this month! What does that mean? Well the already great starter kit of $125 worth of products that YOU pick for $99 plus tax gets an extra product bundle added that YOU pick! I would love to have you join my team of happy shoppers and demonstrators this month. To join my Stampin’ Up!® Team - https://KarenDay.stampinup.net click on the Join button at the top.

You can now follow my blog by email! Yep... brand new posts in your inbox!

Are you in the United States? I would LOVE to be your Stampin'Up! Demonstrator!


If you are in the United States and not currently working with a Stampin' Up! Demonstrator, you can order supplies in my online store, here.


0

Kylie's Demonstrator Support Blog Hop June 2020

Monday, June 15, 2020


Hey Y'all!! 
Thank you for joining us for our Stampin' Up!® Demonstrator Monthly Team Blog Hop! We are so happy that you could join us today for this blog hop for ideas and creative inspiration. We are a group of Stampin' Up!® Demonstrators from around the world that are taking part in training that is helping us to build a successful Stampin' Up!® business and reach some goals we have set. We really appreciate your support.

You may be starting here or have come from another blog - either way you can find the link list at the bottom of this post so that you can see every blog post and idea today.


Today is my first ever time joining in the Hop as a participant... lurker alert! LOL So for my first every project I am sharing this card. 


I love the simplicity of this card, yet it still packs a punch! To make this card I used the Tasteful Touches stamp set, the In Good Taste DSP, and 4 colors (Melon Mambo, Pumpkin Pie, Daffodil Delight, and Crumb Cake). I did use Tuxedo Black Memento ink for the "Hello". When I first got this set as part of the pre order, I was a little hesitant to use this set. I was the first thing in the pre order that I knew I needed to get but once it got here it was a little intimating. I stamped the feathers in several different colors but didn't love any of them. I had this color combo out on my table and decided what the heck, it's just paper and ink. I am in love with the end results. So here is my tip, when feeling intimated by a project try several different color combinations. Let the set "tell" you where it wants to go. Pair a neutral, like Crumb Cake, with bright colors for balance. You never know when the magic is going to happen!

Thank you so much for coming by today! We have an amazing line up of Stampin' Up!® demonstrators from around the world that are working hard to learn how to be even more successful. We know you are going to love all the amazing projects that you are going to see today, make sure you show them some love so they keep creating and sharing fantastic ideas for us all.

Don't miss one blog link. Remember you are currently on my page - Karen Day, see who is below me to know where to go next. Happy hopping! 


Blog Hop List


Products Used:


One last thing, This month- the month of June- Stampin'Up! has two great promos going on. The first is for someone who hosts. When your workshop reaches $250 you will be adding an additional $25 in host rewards! As if that wasn't great, the second promo is even better!


Stampin' Up! is adding a free bundle to each starter kit this month! What does that mean? Well the already great starter kit of $125 worth of products that YOU pick for $99 plus tax gets an extra product bundle added that YOU pick! I would love to have you join my team of happy shoppers and demonstrators this month. To join my Stampin’ Up!® Team - https://KarenDay.stampinup.net click on the Join button at the top.

You can now follow my blog by email! Yep... brand new posts in your inbox!

Are you in the United States? I would LOVE to be your Stampin'Up! Demonstrator!


If you are in the United States and not currently working with a Stampin' Up! Demonstrator, you can order supplies in my online store, here.


10

Maker's Monday June 15, 2020

Hey y'all! It's Monday.... and I have to ask, what are you gonna' make today? In my Maker's Monday Live, I am using the fabulous Nothing's Better Than bundle to make 3 projects. And I'm adding a free printable PDF that you can download by clicking the Maker's Monday image below.

 Click for PDF

I hope that you liked these projects as much as I loved making them! Don't forget to download the free PDF with all the measurements HERE. The video below shows how to make each projects, along with some show and tell of cards I was sent this week. 

Products Used:


Are you in the United States? I would LOVE to be your Stampin'Up! Demonstrator!


If you are in the United States and not currently working with a Stampin' Up! Demonstrator, you can order supplies in my online store, here.


0

Adulting is Hard Cocktail card.... Pretties Team Swap

Saturday, June 13, 2020
Hey Y'all! Today I am sharing a card (and video) of the card I made for our team swap. This card features the Nothing's Better Than bundle that was created by Connie Stewart. I LOVE the retro feel to this card. The video discusses how I stamped the background and drink image, as well as shows a step by step to put the card together.


And we all have someone in our life who needs this card in their mailbox! Somedays I feel so together and other days, I put my cell phone in the fridge by the Orange Juice I just put up. I thought this card would be a great just because card and I love the humor in it. We all need to laugh a little more.


Details for today's card

Measurements:
  •  top folding 4 1/4" x 5 1/2" card in Bermuda Bay
  • Whisper White layer 4 1/8" x 5 3/8"
  • Coastal Cabana layer (this is the layer I stamped on) 4" x 5 1/4"
  • 2" circle punched in Whisper White
  • 1 1/2" x 4" Bermuda Bay pieced punched with the Banner Triple Punch
  • scrapes of Coastal Cabana for greeting

Products Used:


You can now follow my blog by email! Yep... brand new posts in your inbox!

Are you in the United States? I would LOVE to be your Stampin'Up! Demonstrator!


If you are in the United States and not currently working with a Stampin' Up! Demonstrator, you can order supplies in my online store, here.


0

Get Ink'd: Jar of Flowers You are Special Card

Friday, June 12, 2020
Hey Y'all!

Today I am sharing a card using the tulip stamp out of the Jar of Flowers set. This card is packed with ideas and techniques. The bottom portion of the card was colored with a sponging technique, while the flowers at the top feature my scribble coloring technique. To create the card, I started by adding a piece of delicate surface painters tape to the card front just below center. Using Tuxedo Black Memento Ink, I stamped the tulip stamp three times across the top. I also stamped the message on the Just Jade cardstock piece.  Next I colored the stamped images with Stampin' Blends. I used the quick color scribble technique to add the color. Before removing the tape, sponge the bottom portion of the card with Misty Moonlight ink in a circular motion. Remove the tape. I didn't want the bulk of two additional layers, so I created small strips of Misty Moonlight cardstock and placed them at the top and bottom of  the Just Jade paper and adhered all three pieces. Adding a few sequins and some Wink of Stella finished off the card.


Details for today's card

Measurements:
  •  top folding 4 1/4" x 5 1/2" card in whisper white.
  • Basic Black layer 4 1/8" x 5 3/8"
  • Whisper White layer (this is the layer I stamped on) 4" x 5 1/4"
  • Just Jade is 1"x 5 1/4" 
  • Misty Moonlight (x2) 1/4" x 5 1/4"

Products Used:


You can now follow my blog by email! Yep... brand new posts in your inbox!

Are you in the United States? I would LOVE to be your Stampin'Up! Demonstrator!


If you are in the United States and not currently working with a Stampin' Up! Demonstrator, you can order supplies in my online store, here.


0
Powered by Blogger.
BloglovinEmailPinterestTPT